When Everything Is One Room, Every Choice Counts
Open floor plans photograph beautifully.
No walls. No barriers. Just one big open space full of potential.
But living in one? That’s something else. It can feel chaotic fast.
Your “kitchen” is three feet from your bed. Your “living room” spills into your workspace. There’s no escape, there’s nowhere to hide the mess, and nothing set up as one part of your life ending and another beginning.
Sound familiar?
The good news is that an open floor plan isn’t a design mistake. It’s a blessing in disguise — as long as you know how to handle it.
The best studio apartment space hacks do more than create storage. They give the space structure, define zones, and make your space feel intentional. Like a real home — not just one room where you sleep, eat, and work.
In this article, you’ll find 8 of the best studio apartment space hacks designed specifically for open floor plans. These are not platitudes you’ve read a hundred times. These are tactical moves that address the specific complications of living in a wide-open space with absolutely no partition walls.
Let’s get into it.
Why Open Floor Plans Have Their Own Unique Challenges
Before the hacks, let’s discuss why open layouts can be uniquely tricky.
In a conventional apartment, walls do much of the heavy lifting. They divide your bedroom from your living area. They conceal clutter in one area from visitors in another. They provide acoustic privacy and visual respite.
None of that exists in a studio with an open floor plan.
All of it is visible, all the time. Every dish in the sink. Every unmade bed. Every pile of laundry. It all resides in the same visual frame — which gives a sense of constant clutter, even when things are fairly tidy.
Storage bins aren’t the answer. It’s smart zoning and smart storage combined. You have to create the sense of separate rooms without sacrificing the open layout.
And that’s precisely what these 8 hacks accomplish.
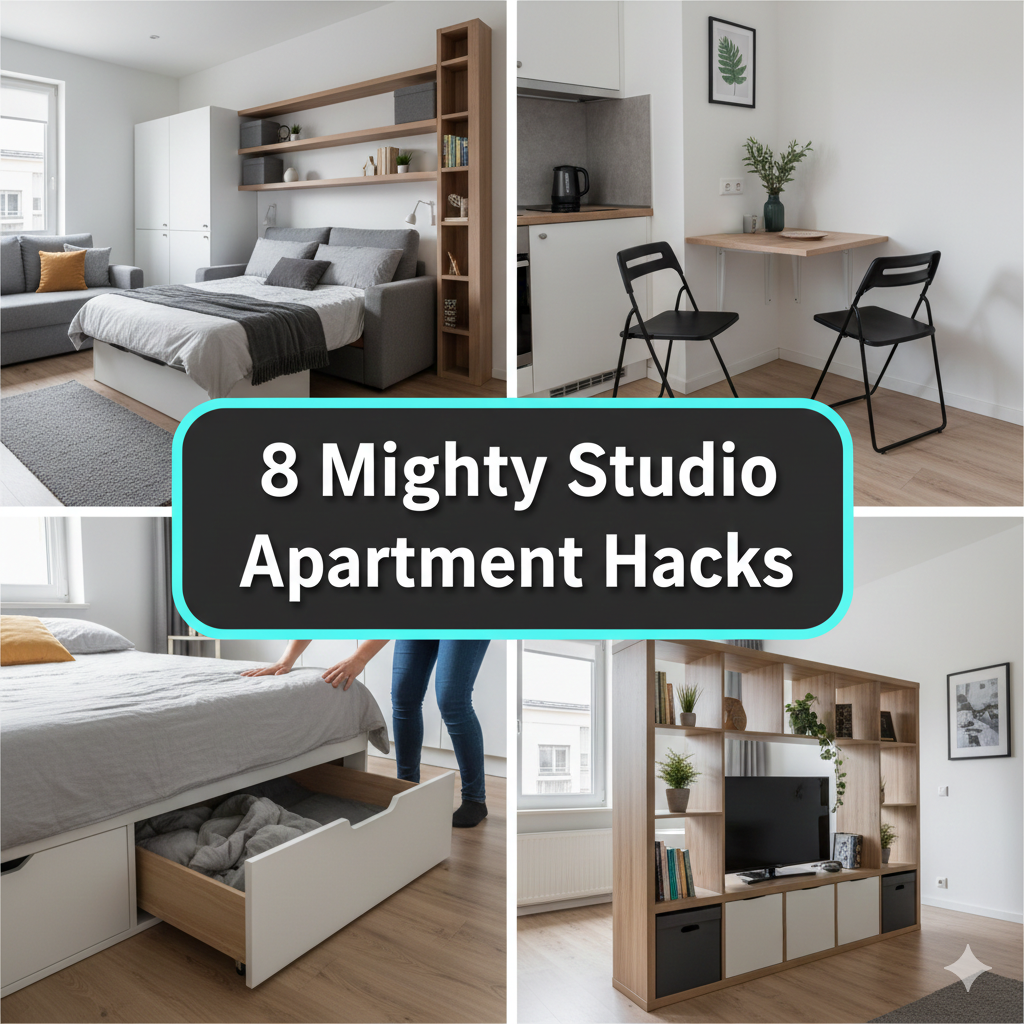
Hack No. 1: Zone Your Space Like an Interior Designer
Stop Treating Your Studio Like One Big Room
The biggest mistake people make in open floor plan studios? Thinking of the entire space as one zone.
It isn’t. It shouldn’t be.
Even if you have no walls, you can create clearly defined zones — a sleep zone, a living zone, a work zone, a dining zone. The secret is providing visual cues, not physical ones.
Area rugs are the ultimate zoning tool. Lay down a large rug beneath your sofa and coffee table to delineate the living area. Place a different rug by your bed to delineate the sleep zone. The instant your eye crosses a rug border, your brain registers a “room change” — even if there’s nothing physically dividing the areas.
Furniture placement works the same way. Position your sofa with its back to the bed. Just that one move creates a visual separation between your living and sleeping spaces. Add a sofa table behind the couch to help cement the division.
Lighting zones are another powerful tool. Opt for a warm pendant light above your dining space. Try a bright floor lamp next to your desk. Use soft bedside lamps in the sleep zone. Lighting varies between zones, giving each one a unique feel — particularly at night.
Why Zoning Is Also the Solution to Storage Problems
Most people don’t realize this, but proper zoning actually makes storage easier.
When everything has a zone it belongs in, you always know where it’s supposed to go. Kitchen items remain in the kitchen zone. Work things stay in the work area. That mental clarity reduces clutter by default.
For even more ideas on making your open-plan studio feel intentional and organized, visit Studio Apartment Setup — a dedicated resource full of smart tips for small-space living.
Quick Zoning Reference Guide
| Zone | Zoning Tools | Storage Focus |
|---|---|---|
| Sleep zone | Rug + bed placement + soft lighting | Under-bed storage, headboard shelves |
| Living zone | Sofa orientation + area rug + pendant light | Ottoman storage, floating shelves |
| Work zone | Desk placement + task lighting + divider | Wall-mounted desk storage, file bins |
| Dining zone | Table placement + overhead lighting | Foldable furniture, wall hooks nearby |
| Entryway zone | Console table + rug + hooks | Key hooks, shoe storage, bag hooks |
Hack No. 2: Don’t Let a Divider Just Divide
A Divider Must Never Merely Divide
In an open floor plan studio, a room divider is prime real estate. If all it does is split space and nothing else, it’s not living up to its potential.
The best dividers in a studio apartment do two — and often three — key things: they separate zones and provide storage.
Bookshelf dividers are the gold standard. A tall, open bookshelf inserted between your living area and sleeping area establishes a visual boundary while storing books, plants, decor, baskets, and more. The open design helps the space feel airy — it doesn’t block light as a solid wall would.
Curtain dividers offer a budget-friendly alternative. Consider installing a ceiling-mounted curtain track with floor-to-ceiling curtains that can be opened during the day and closed for privacy at night. Opt for a light fabric to help the space stay open and bright.
Folding screen dividers work well for smaller studios. Look for ones with built-in shelves or hooks. They can be easily moved as your needs evolve — ideal for renters who crave flexibility.
The Storage Bookshelf Divider Setup
Here’s a specific setup that works great in open floor plan studios:
Put a 6-foot open bookshelf perpendicular to the wall between your bed and your sofa. Direct the shelves toward the living area for easy access. Mount a small pegboard, hooks, or even a fabric panel on the back — the side that faces the bed — for added function.
One piece of furniture. Two zones created. Tons of storage added. That’s efficiency.
Hack No. 3: Build a “Fake Wall” With Furniture and Curtains
You Don’t Need Real Walls to Have Real Privacy
Visual privacy is one of the biggest frustrations with an open floor plan — especially when it comes to your sleeping area.
Nobody wants to feel like they’re sleeping in the heart of their living room.
Building a “fake wall” is one of the most transformative studio apartment space hacks for open layouts. It gives the appearance of a separate bedroom without any construction.
Here’s how to do it:
Method 1 — Curtain wall: Install a ceiling-mounted curtain rod wide enough to span your sleeping area. Use blackout curtains for complete nighttime privacy, then draw them back during the day. This is very inexpensive and makes a massive visual impact.
Method 2 — Tall furniture wall: Place a dresser, wardrobe, or combination of tall furniture pieces next to each other to create a screen around your sleep zone. This serves double duty — it breaks up the space and offers enormous storage.
Method 3 — Half-wall shelf: Install a low row of floating shelves or cabinets at about 4–5 feet high to create a visual partition. Low enough to let light spill over the top, high enough to delineate the zones visually.
Method 4 — Combination approach: Use a curtain on one side and a bookshelf divider on the other. Your sleeping space now has two distinct borders — and lots of additional storage built right in.
Hack #4: Go Vertical on Every Wall You Have
Walls Are Your Most Precious Storage Asset in an Open Floor Plan
Unlike traditional apartments, open floor plan studios tend to have fewer interior walls. That makes the walls you do have extremely precious.
Don’t waste them.
Going vertical means installing shelving, hooks, cabinets, and storage systems that reach all the way to the ceiling. It moves storage off the floor — which helps an open layout feel less cramped — and massively increases capacity.
Floor-to-ceiling shelving units anchor a wall and provide dramatic, functional visual interest. Use them to store books, baskets, decor, and everyday items. They force the eye upward, which makes ceilings seem higher and the room seem larger.
Staggered floating shelves at different heights create visual intrigue while still maximizing storage. Vary shelf sizes — some wide, some narrow — so the wall doesn’t look flat and boring.
Wall-mounted storage systems such as IKEA SKÅDIS or similar pegboard systems allow you to create a custom storage layout and change it whenever necessary. Perfect for a work zone wall.
According to Apartment Therapy, one of the most effective ways to maximize storage in a small space is to treat your walls like valuable square footage — going floor to ceiling wherever possible.
How High Is Too High?
One popular concern is that shelves reaching all the way up to the ceiling will overwhelm a small space. The opposite is actually true.
Low shelves cut a room visually in half. Tall shelves draw the eye upward and make a space seem taller. As long as the top shelves are kept organized and not crammed, going vertical always makes a studio feel larger — not smaller.
Vertical Storage Impact Chart
| Shelf Height | Visual Effect | Best Use |
|---|---|---|
| Below 3 ft | Makes room feel low and cluttered | Avoid as primary storage |
| 3–5 ft | Eye-level, easy access | Daily use items |
| 5–7 ft | Above eye level, still reachable | Less frequent items |
| 7 ft to ceiling | Dramatic, space-expanding effect | Seasonal or rarely used items |
Hack No. 5: Choose Small-Footprint Furniture
Big Furniture Is the Enemy of an Open Floor Plan Studio
There’s one rule that applies to every open floor plan studio: your furniture should serve the space, not dominate it.
Oversized furniture is one of the quickest ways to wreck an open layout. A giant sectional sofa. A massive dining table. A king-size bed with bulky side tables. These pieces eat up floor space and disrupt the natural flow of an open room.
Instead, choose furniture with a small footprint — pieces that go tall or stay compact rather than spreading wide.
Apartment-size sofas (generally under 80 inches wide) allow comfortable seating without engulfing your living zone. Pair with a slim-profile coffee table or storage ottoman to keep the zone airy.
Loft beds or platform beds have a lower visual profile than traditional bed frames with tall headboards and footboards. A platform bed sits closer to the floor and feels less imposing in an open space.
Round dining tables visually take up less space than rectangular ones and allow easier movement around them. A round table for two can often fold out to seat four when needed.
Leggy furniture — pieces with visible legs rather than bases that sit flush on the floor — lends a sense of airiness. When you can see floor beneath a sofa or chair, the room feels more open.
The “Breathing Room” Rule
For every piece of furniture you add to an open floor plan studio, leave at least 18–24 inches of walkway around it.
Tight corridors turn a studio into an obstacle course. Open pathways make it feel like a well-designed home.
If 18 inches of clearance can’t be maintained around a piece of furniture — it’s too big for the space.
Hack #6: Treat Every Transition Area as a Storage Opportunity
Secret Free Storage Is Hidden in the Spaces Between Zones
In an open floor plan, the spaces between zones are frequently wasted. The strip of wall between the kitchen and living area. The narrow space beside the fridge. The gap next to the front door.
These transition spaces may be small — but together, they can add up to a good deal of usable storage in your studio.
Console tables placed between zones function as both zone dividers and storage surfaces. Place one between your living and dining areas. Use the surface for a lamp and decorative items, the shelf below for baskets or books, and hooks beneath for bags.
Narrow rolling carts slide into spaces between appliances, alongside furniture, or in slim wall gaps. An entire pantry’s worth of spices, oils, and small supplies can fit in a 6-inch-wide rolling cart beside the refrigerator.
Entry zone maximization is seldom discussed but incredibly effective. The 3–4 feet near your front door is transition space — use it well. A narrow console table with hooks above and shoe storage below can sort your complete “come and go” routine in less than 12 inches of depth.
Over-door storage is useful in any zone. Kitchen pantry door, closet door, bathroom door — every one is a free storage surface that the vast majority of studio dwellers completely take for granted.
Transition Zone Storage Ideas
| Transition Area | Storage Solution | Capacity Added |
|---|---|---|
| Between kitchen and living zone | Console table with hooks | Bags, decor, books, keys |
| Beside refrigerator | Slim rolling cart (6–8 inches wide) | Spices, canned goods, bottles |
| Near front door | Slim console + wall hooks + shoe rack | Shoes, coats, keys, bags, mail |
| Between bed and desk zone | Low bookshelf or curtain divider | Books, office supplies, decor |
| Beside sofa | Tall narrow side table | Books, remotes, charging station |
Hack #7: Use Light and Mirrors to Make Storage Feel Invisible
The Psychology of Space — How Your Eyes Decide Whether a Room Feels Big
This hack is a little different. It’s not about adding physical storage. It’s about making your space feel larger — so the storage you already have feels sufficient.
In an open floor plan studio, visual clutter is magnified because everything is always visible. The answer is not simply to be better organized. It’s using light and reflection to create depth and distraction.
Large mirrors are one of the most powerful tools in small-space design. A freestanding mirror leaned against a wall or a big wall-mounted mirror bounces light around and creates the illusion of depth — making your studio feel larger than it is. For maximum effect, place a mirror opposite a window.
Mirrored furniture such as a mirrored dresser or side table serves double duty: it offers storage and contributes to the visual expansion of the space.
Natural light maximization matters enormously. Keep window areas clear of furniture and clutter. Consider sheer curtains in place of heavy drapes to let as much light as possible in. A brighter studio always feels bigger.
Under-furniture lighting is a lesser-known trick. LED strip lights underneath a bed frame, sofa, or floating shelves create a floating effect that reduces the visual weight of the furniture — making the room feel more open.
Light Color Palette for Walls and Storage Units
| Element | Recommended Color | Effect |
|---|---|---|
| Walls | White, off-white, light gray | Maximum light reflection, feels spacious |
| Shelving units | White or natural wood | Blends with wall, reduces visual clutter |
| Accent furniture | One bold color or texture | Creates focal point without overwhelming |
| Curtains/dividers | Light linen or sheer white | Maintains airiness while defining zones |
| Rugs | Medium tone with subtle pattern | Defines zones without darkening the floor |
Hack #8: Set Up a Command Center to Manage Daily Chaos
The Single Spot That Keeps Your Entire Open-Plan Studio in Order
In a traditional home, each room deals with its own type of clutter. Mail gets put on the kitchen counter. Bags are dropped in the hallway. Work stuff stays at the office.
In an open floor plan studio, everything lands everywhere — because nothing has anywhere specific to go.
A command center solves this completely.
A command center is a single, dedicated wall zone — typically located near the front door or in the entryway area — that handles all the “daily chaos” items. Keys. Mail. Bags. Charging cables. To-do lists. Calendars. Shopping lists.
Everything that would otherwise float around your studio and create visible clutter gets captured here instead.
How to Build a Studio Command Center
Here’s a simple setup that works in any open floor plan studio:
Step 1 — Choose your wall. Pick a spot near your front door or in the entryway area. Even a 3-foot section of wall is enough.
Step 2 — Install a pegboard or wall organizer. This is your base. It holds hooks, small shelves, bins, and whatever else you need.
Step 3 — Add hooks for keys and bags. These should be the first things you reach when you walk in — so put them front and center at easy-reach height.
Step 4 — Add a small shelf or tray for mail. One tray or shallow wall pocket prevents mail from collecting on every flat surface in your studio.
Step 5 — Add a charging station. A small power strip with cable management tucked into the command center zone means your phone and devices always have a home — not your nightstand, not your desk, not your kitchen counter.
Step 6 — Add a small calendar or whiteboard. In an open floor plan studio, visual organization tools help the entire space feel deliberate rather than reactive.
Command Center Essentials Checklist
| Item | Function | Space Required |
|---|---|---|
| Key hooks | Solve the “where are my keys” problem | 3–4 inches of wall |
| Mail tray/pocket | Manage paper clutter | 6–8 inches of wall |
| Bag hooks | Keep bags off the floor | 4–6 inches per hook |
| Charging station | Central device charging point | Small shelf space |
| Small whiteboard | Daily notes, reminders, lists | 12–18 inches of wall |
| Shoe tray or rack | Catch shoes at the door | Floor space at base |
Putting All 8 Hacks Together: Your Open Floor Plan Transformation Blueprint
Eight hacks is a lot. Here’s how to tackle them without burning out.
Phase 1 — Zone first (Week 1). Before buying anything, rearrange your existing furniture to create defined zones. Turn the sofa. Reposition your desk. Add a rug if you have one. Zoning is free and instantly transforms how your space feels and operates.
Phase 2 — Add dividers and vertical storage (Weeks 2–3). Install floating shelves. If necessary, put up a bookshelf divider. Hang a curtain track as a sleep zone divider. These adjustments provide the most storage for each dollar spent.
Phase 3 — Build your command center (Week 3). Choose a wall in your entryway and set up your command center. This one change decreases daily clutter more than almost anything else.
Phase 4 — Replace furniture gradually (Ongoing). Swap oversized pieces for right-sized, multi-function alternatives as your budget allows. This is the longest phase — but every swap makes a noticeable difference.
Phase 5 — Add light and mirrors (The final touch). Once your zones are set up and storage is sorted, use mirrors and lighting to polish the space and make everything feel intentional.
Frequently Asked Questions
What is the most challenging aspect of living in an open floor plan studio?
The most significant challenge is visual clutter. Because everything is always visible, even a little bit of mess feels overwhelming. The solution is a mix of smart zoning, appropriate storage, and a command center that collects everyday items before they float around the room.
How can I create a bedroom area in a studio without walls?
Define your sleep zone with a curtain divider, a room-divider bookshelf, and area rugs. The best and most affordable way to give an open-plan space the feel of a bedroom is with full-length curtains on a ceiling-mounted track.
Can an open floor plan studio really feel like a one-bedroom apartment?
Yes — assuming you have the right zoning and dividers. The idea is not to trick anyone. The point is to create enough visual separation that your brain identifies distinct zones as different spaces. When done correctly, a well-zoned studio genuinely feels bigger and more organized than a poorly zoned one-bedroom.
What is the best room divider for a studio apartment?
The best all-around choice is generally a tall, open bookshelf. It splits space, maintains airflow and light, provides serious storage, and looks intentional rather than makeshift. For budget-conscious renters, ceiling-mounted curtains are the next best option.
How do I stop my open floor plan studio from feeling like one big closet?
The trick is keeping floor space clear and moving storage onto walls and vertical surfaces. Define zones with rugs and furniture placement. Provide enough lighting in every zone. And declutter regularly — in an open floor plan, editing what you own is just as important as where you put things.
Do studio apartment space hacks work for really tiny studios under 300 square feet?
Yes — in fact, they work better in smaller studios since every change has a greater proportional impact. Focus on Hacks 1, 2, 4, and 5 first: zoning, dividers, vertical storage, and small-footprint furniture. These four alone can transform even the smallest open floor plan.
Should I hire an interior designer for a studio apartment?
It can be worth it — but it doesn’t have to be. Most of these hacks are DIY-friendly and extremely affordable. Begin by rearranging your own furniture (free) and introducing rugs and hooks (low cost). If you’re still struggling after that, a one-hour consultation with an interior designer can give you more specific guidance without a huge spend.
An Open Floor Plan Is a Blank Canvas — Here’s How to Paint It Right
Here’s the bottom line:
An open floor plan studio is not a problem. It’s a starting point.
Most people move in, place furniture against the walls, and wonder why the space doesn’t feel right. They haven’t zoned. They haven’t gone vertical. They haven’t claimed the transition areas or built a command center. They’re occupying the space without really designing it.
These 8 studio apartment space hacks give you a framework to design your open layout on purpose — with smart zones, maximized storage, and a flow that makes daily life easier and less stressful.
You don’t need a renovation. You don’t need a larger budget. You needed a plan — and now you have one.
Start with one hack this week. Move your sofa. Add a rug. Install a shelf. Whatever feels most manageable right now — do that first.
Because the best studio apartment space hack of all is simply this: start.
Your open floor plan is waiting to become the intentional, organized, comfortable home it was always meant to be. All that’s left is you taking that first step.