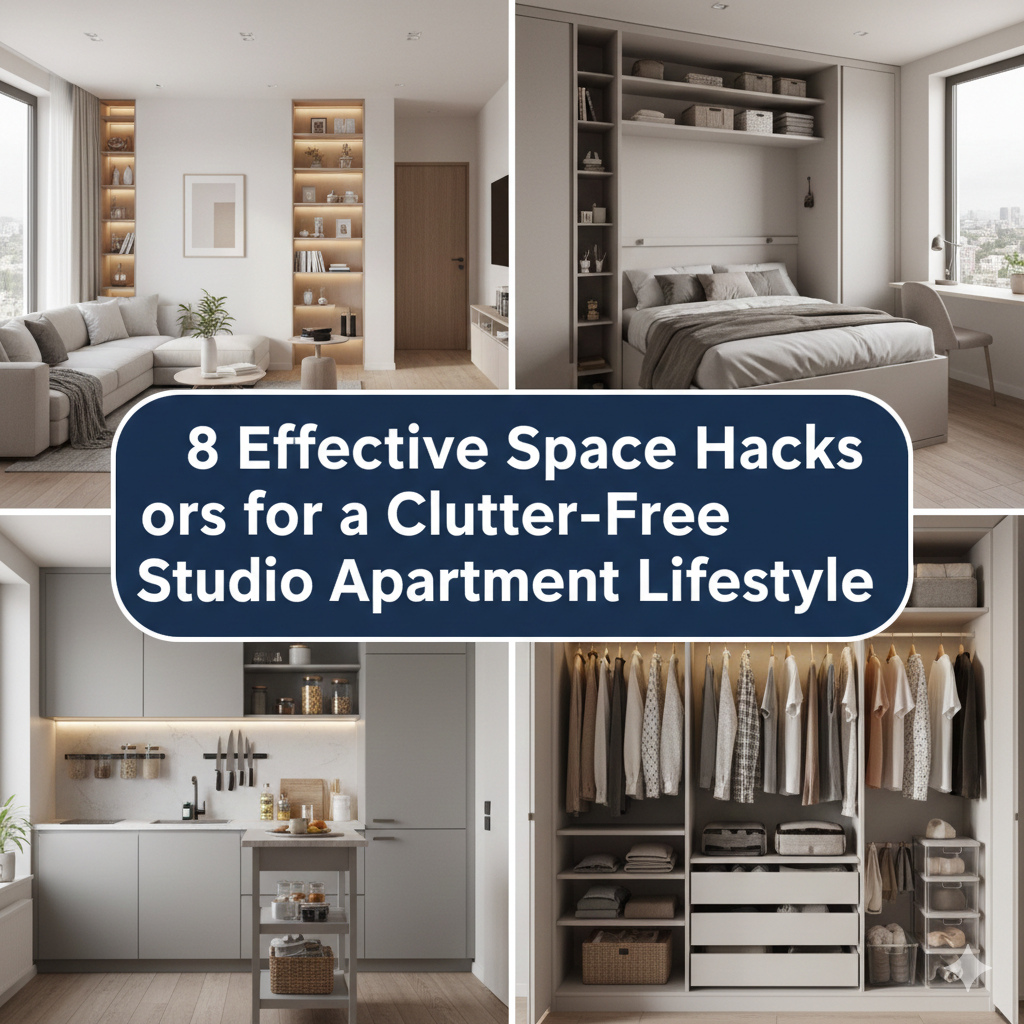
Space Hacks for Studio Apartments That Change the Way You Live
Here are 8 effective ways to declutter and make the most of every square foot!
You Don’t Want More Space — You Want Smarter Space
Be it from lifestyle to decor, every nook and cranny starts to feel like a puzzle piece within a studio apartment. Where does the couch go? How do you really store clothes without a closet? Can you even have a “living room” and a “bedroom” in the same room?
The answer is yes — and thousands do it beautifully.
The secret isn’t having a larger apartment. It’s making use of the space you already have in more efficient ways. Whether you’re moving into your first studio or you’ve been in one for years, these space hacks will make it easier to breathe, think and enjoy where you live.
This guide will walk you through 8 real, tested strategies — not Pinterest fluff — that you can use in actual small spaces.
Hack #1: Put Your Furniture to Work (Double — or Triple — Duty)
The golden rule when it comes to studio living: every piece of furniture should earn its place.
If a piece does only one thing, it’s taking up prime real estate. Multi-purpose furniture is the bedrock of a clutter-free studio lifestyle.
The Best Space-Saving Furniture to Consider
| Furniture Piece | Primary Use | Bonus Use(s) |
|---|---|---|
| Storage ottoman | Seating | Storage + coffee table |
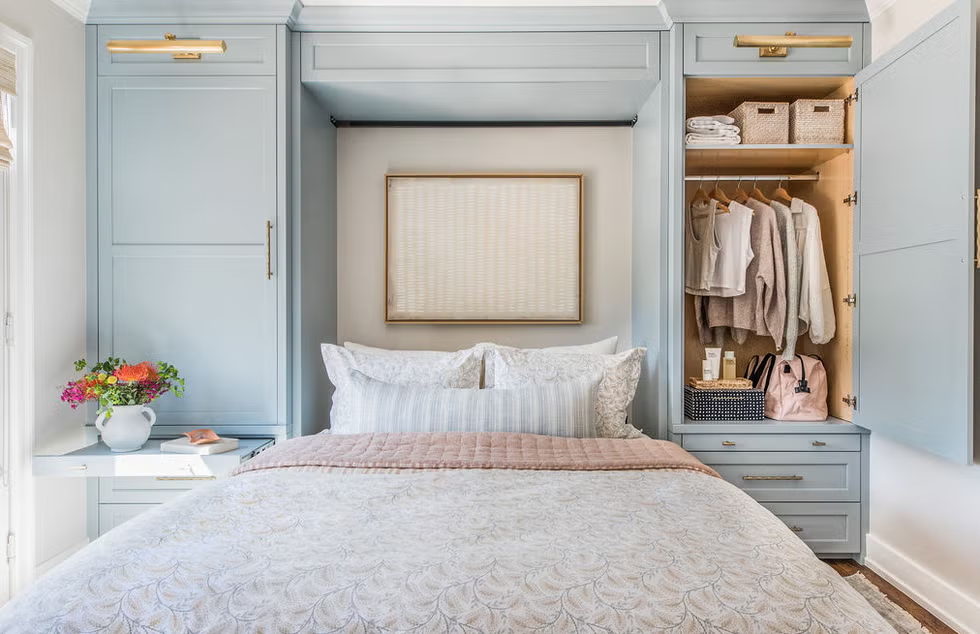
| Murphy bed | Sleeping | Wall space when folded up |
| Lift-top coffee table | Coffee table | Desk + hidden storage |
| Sofa bed | Seating | Guest sleeping |
| Nesting tables | Side tables | Extra dining space |
| Bench with storage | Entryway seating | Shoe/accessory storage |
For example, a bed that has drawers underneath eliminates the need for an entire dresser. A folding dining table that rests against the wall gives you back your floor space whenever you’re not eating.
Consider your furniture to be employees. Each of them should have at least two jobs. If it merely accomplishes one, think about replacing it with something more beneficial.
Where to Start
Go room by room — or in a studio, zone by zone — and ask: “Is this pulling its weight?”
Opt to upgrade your bed and sofa first because they occupy the most floor space. These two swaps alone can make your studio feel much bigger.
Hack #2: Go Vertical — Your Walls Are Wasted Storage
The floor is what most people think about. Smart studio dwellers consider wall space.
Your walls run all the way to the ceiling. It’s free storage space you likely don’t even use.
The Art of Maximizing Vertical Space
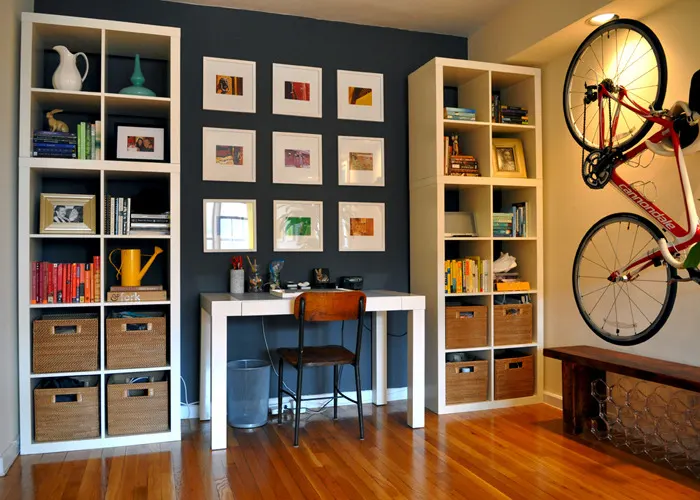
Floating shelves are your new best friend. Hang them over your desk, above your bed or across an empty wall. They hold books, plants, decor and everyday items without taking up floor space.
Floor-to-ceiling bookshelves are another game-changer. They draw the eye upward, which helps give that room a taller and larger feel. You can put books, baskets, folded clothes, and additional objects on them.
Pegboards can be a super effective solution in kitchen and office zones. Install one in your kitchen for pots, utensils and small tools. Mount one in your workspace for office supplies, headphones and cables.
Over-door organizers are often ignored. The back of each door in your studio — bathroom, closet, front door — is usable space. Hang shoe pockets, hooks or small baskets there.
A Simple Vertical Storage Rule
If it can hang, float or mount — it doesn’t need to sit on the floor.
By simply changing your thinking, you can double the amount of effective storage in your space without adding a single square foot.
Hack #3: Zone Without Installing Walls
One of the biggest downsides of studio apartments is that everything happens in one room. You sleep, eat, work, relax and entertain — all in the same space.
A studio can feel chaotic without defined zones. With zones, it feels intentional and well-organized.
4 Easy Ways to Define Zones
1. Rugs Put a rug underneath your bed to define the “bedroom” area. Put a different rug under your couch and coffee table to define the “living” area. Rugs carve out spaces without any construction.
2. Positioning of Furniture Point the sofa away from the sleeping area. This establishes a natural “back wall,” signaling the living zone ends here. You don’t need a real wall — just a visual barrier.
3. Curtains or Room Dividers A floor-to-ceiling curtain on a tension rod can separate your sleeping area when desired. This is particularly useful if you ever accommodate guests. Room dividers work the same way — no installation necessary.
4. Lighting Place a warm lamp over your bed and brighter task lighting above your desk. Playing with different lighting moods instantly makes zones feel different. Over time, your brain will connect each space with a different task.
Why Zones Reduce Clutter
When everything has a “place” — an area it belongs to — things are less likely to float around the apartment. Clutter often occurs when there are no defined homes for things. Zones are invisible guidelines that keep your space naturally organized.
Hack #4: Commit to the One In, One Out Rule
Here’s a reality most organizing books fail to tell you: smart storage can only get you so far when you never stop adding stuff.
Studio apartments are unforgiving when it comes to clutter. There’s nowhere to conceal it.
What the Rule Means
Whenever something new comes in — a new shirt, a new kitchen gadget, a new book — something old has to go out.
That’s it. Simple. But incredibly effective.
Why It Works So Well in Studios
In a bigger house, you can stuff things into a spare room or unused closet. Studios don’t offer that escape. Clutter is constantly in plain sight, constantly in your path, creating stress.
The one-in, one-out rule keeps you intentional. Before purchasing something new, you must ask: “What am I willing to give up in order to have this?” That one question alone prevents a lot of unnecessary purchases.
Monthly Clutter Audit Checklist
Go through this quick checklist once a month:
- [ ] Do I own clothing that hasn’t been worn in the past 3+ months?
- [ ] Are there kitchen items I haven’t used since moving in?
- [ ] Do I have duplicates of anything? (Two can openers, three spatulas?)
- [ ] Are there things on surfaces that don’t have a clear “home”?
- [ ] Do I have anything broken or damaged that I keep promising myself I would repair?
Everything that gets a “yes” can be considered for donating, selling or tossing.
Hack #5: Master the Art of Hidden Storage
The cleanest-looking studio apartments aren’t minimalist — they’re just masters at concealing their stuff.
Hidden storage is what separates a space that looks like a showroom from one that merely looks like a storage unit.
The Most Common Hidden Storage Areas People Forget About
Under the bed: This is the most underutilized storage area in most studios. If your bed lacks built-in drawers, buy bed risers and put flat bins under it. Store off-season clothes, surplus linens, shoes or anything you don’t use daily.
Inside ottomans: As noted above, lidded ottomans are perfect for throw blankets, remotes, chargers, board games — all the random stuff that collects on tables.
Inside decorative boxes and baskets: Baskets sitting on shelves aren’t just decorative. They’re an acceptable way to cover up a mess. Cables, mail, little accessories — toss them into a stylish basket and suddenly you have a curated-looking shelf.
Toe-kick drawers in the kitchen: The area between the bottom of your kitchen cabinets and the floor is often left unused. Some people add shallow pull-out drawers here for baking sheets, cutting boards and cleaning supplies.
Luggage: Those suitcases are already taking up space — time to put them to work. Store off-season items inside your luggage as it sits in the closet.
Hidden Storage Quick-Win Table
| Problem | Hidden Storage Solution |
|---|---|
| Too many cables | Decorative box on desk shelf |
| Extra bedding | Flat bins under the bed |
| Random small items | Ottoman with lid |
| Kitchen clutter | Toe-kick drawers |
| Off-season clothes | Inside luggage in closet |
| Cleaning supplies | Back of cabinet door organizer |
Hack #6: Use Light and Mirrors to Create the Illusion of Space
This hack doesn’t create more storage, but it changes the feel of your studio — and how a space feels matters more than you might think.
A space that feels cramped is stressful. An open and airy space feels calming. Two studios of identical square footage can feel completely different depending on light and mirrors.
The Mirror Strategy
Mirrors reflect light and create the perception of depth. A large mirror on one wall can make a room feel nearly twice as wide.
The best spots for mirrors in a studio:
- Opposite a window — bounces natural light back into the room
- At the end of a narrow space — makes it feel longer
- As a sliding closet door — practical and space-expanding
You don’t need to cover every wall in mirrors. One large, strategically placed mirror does the heavy lifting.
Lighting Tips That Open Up a Space
Natural light is king. Keep window treatments light and airy — sheer curtains or no curtains at all. Heavy drapes eat light and make spaces feel smaller and heavier.
Layer your lighting. Don’t rely on one overhead fixture. Add floor lamps, desk lamps and bedside lights. Multiple light sources make a room feel more dynamic and spacious.
Use warm-toned bulbs. Cool white light can feel clinical in small spaces. Warm light (around 2700K–3000K) feels cozy and inviting without closing the room in.
Avoid dark walls if you’re allowed to paint. Light, neutral colors reflect more light. If you’re in a rental and can’t paint, use light-colored furniture and rugs to create the same effect.
Hack #7: Build a Command Center for Everyday Chaos
The messiest spots in any studio are usually the entryway and whatever surface is closest to the door.
Keys, mail, bags, shoes, chargers — it all lands in a pile just inside the front door. This “drop zone chaos” is one of the quickest ways a studio goes from clean to cluttered.
The fix? Build a command center.
What Is a Command Center?
A command center is a dedicated, organized space — typically near the entrance — where all the daily essentials live. It’s not just a shelf. It’s a system.
How to Build One in a Small Space
Step 1: Install hooks near the door. Keys, bags, coats and umbrellas all get a hook. When they have a home, they don’t end up on your couch or kitchen counter.
Step 2: Add a small tray or dish. This is where loose items like sunglasses, earbuds and transit cards live. One tray, not a pile.
Step 3: Include a mail slot or file folder. Mail is one of the biggest clutter creators. A small wall-mounted mail organizer sorts it immediately — incoming, outgoing, to-file.
Step 4: Charge devices here. A multi-port USB charger mounted near the command center keeps all your devices out of the bedroom and in one spot.
Step 5: Add a small shoe rack. Even a two-tier mini rack prevents shoes from spreading across the floor.
This system takes up very little wall space — maybe 2–3 feet wide — but it eliminates the chaos that happens every time you walk in the door.
Hack #8: Digitize, Donate, and Downsize Ruthlessly
The last hack has less to do with furniture and more to do with mindset — but it might be the most powerful one on this list.
Physical clutter is frequently a sign of unmade decisions. Every item you’re holding onto “just in case” is a decision you haven’t made yet. In a studio, those unmade decisions pile up fast.
Three Types of Clutter You Need to Deal With
Papers and documents: Many people hold onto far too much paper. Bills, receipts, manuals, old mail — most of it can be scanned and stored digitally. Use a free app like Adobe Scan or Google Drive. Once it’s digital, recycle the paper. The only documents worth keeping in physical form: legal IDs, passports, property documents and medical records.
Books: Books are heavy, bulky and often re-read far less than we expect. Keep your genuine favorites. Donate the rest to a library or used bookstore. If you read a lot, a Kindle or e-reader is one of the best investments for studio living — one slim device holds thousands of books.
Sentimental items: These are the hardest to let go of. But in a studio, you simply can’t keep everything. A good approach: photograph sentimental items you can’t keep. The memory is preserved without the physical object taking up space.
The 20/20 Rule for Letting Go
This rule comes from minimalist authors Joshua Fields Millburn and Ryan Nicodemus: if an item can be replaced for under $20 in under 20 minutes, it’s okay to let it go. You don’t need to hoard “just in case” items when they’re easily replaceable.
For a deeper dive into designing and organizing your studio from scratch, Studio Apartment Setup is a great resource packed with layout ideas, furniture guides and room-by-room tips.
In Brief: All 8 Hacks at a Glance
| Hack | Core Idea | Biggest Win |
|---|---|---|
| 1. Multi-use furniture | Every item does 2+ jobs | Eliminates redundant pieces |
| 2. Go vertical | Use walls, not floors | Doubles storage without floor space |
| 3. Separate spaces | Visual barriers between activities | Cuts down on mental clutter |
| 4. One in, one out | Prevents clutter before it starts | Stops re-cluttering |
| 5. Hidden storage | Store things inside things | Keeps surfaces clean |
| 6. Light and mirrors | Create a sense of spaciousness | Reduces the “cramped” feeling |
| 7. Command center | Tame daily drop-zone chaos | Eliminates entry pile-ups |
| 8. Digitize and downsize | Cut the physical stuff itself | Frees up the most space |
Putting It All Together: Where to Start
If things feel overwhelming, don’t tackle all eight hacks at once. Choose two or three and do them well.
A good starting sequence:
- Start with hack #4 (one in, one out) — this stops the bleeding immediately.
- Then do hack #8 (declutter ruthlessly) — reduce what you own before organizing it.
- Then apply hacks #1, #2 and #5 — optimize furniture and storage for what remains.
- Finally, add hacks #3, #6 and #7 — refine the feel and function of your space.
The goal isn’t organizing clutter. Eliminating clutter is. Then organizing what’s left becomes easy.
Frequently Asked Questions
Q: How can I make a studio apartment less cluttered without tossing things?
Start with surfaces. Empty every counter, table and shelf entirely, then put back only what you truly use or love. Store everything else in hidden storage — bins, baskets, inside drawers. Surfaces that are 80% clear look dramatically cleaner, even if total volume hasn’t changed much.
Q: What is the best furniture arrangement for a studio apartment?
Put your bed on the longest wall or in a corner to free up central floor space. Keep your sofa oriented toward the room rather than pushed flat against a wall — this creates the illusion of more depth. Your dining area (even a small folding table) works best when it’s near the kitchen to keep zones logical.
Q: How can I separate my bedroom from my living space in a studio?
Use rugs, lighting and curtains to define zones without building walls. A tension-rod curtain is the most flexible option — open it during the day, close it at night for privacy. A bookshelf used as a room divider also works well and adds storage at the same time.
Q: Is buying a Murphy bed for a studio worth it?
For most people, yes — especially if you work from home. A Murphy bed folds into the wall and returns your entire floor space during the day. Paired with a fold-out desk or sofa, it’s one of the most effective studio apartment space hacks available. The upfront cost is higher, but the daily quality-of-life improvement is significant.
Q: How often should I declutter a studio apartment?
A quick tidy should happen daily — 10 to 15 minutes before bed. A deeper declutter (going through drawers, shelves and closets) works well once a month. A full seasonal purge — clothes, kitchen items, general possessions — is best done every three to four months. The smaller the space, the more regularly you need to evaluate what’s in it.
Q: What colors make a studio feel larger?
Light, neutral colors — white, cream, soft grey and warm beige — reflect more light and make walls feel farther apart. If you want color, use it in accents — throw pillows, artwork, plants — rather than on walls. Monochromatic color schemes (variations of the same hue) also create a sense of flow that makes a space feel more expansive.
Small Space, Big Life
A studio apartment is not a consolation prize. For millions of people, it’s a deliberate, smart choice — lower rent, less maintenance and the daily challenge of living intentionally.
The studio apartment space hacks in this guide aren’t about sacrifice. They’re about making the most of what you have. Multi-purpose furniture, vertical storage, clear zones, hidden storage and a ruthless approach to what you actually own — these strategies work whether your studio is 300 square feet or 600.
The goal isn’t a perfect-looking apartment for Instagram. The goal is a space that supports your life — where you can sleep well, work comfortably, relax fully and not spend half your time searching for things or stepping over clutter.
Start with one hack. Make it stick. Then add another.
Your studio might just be the greatest place you’ve ever lived. You just need to set it up that way.