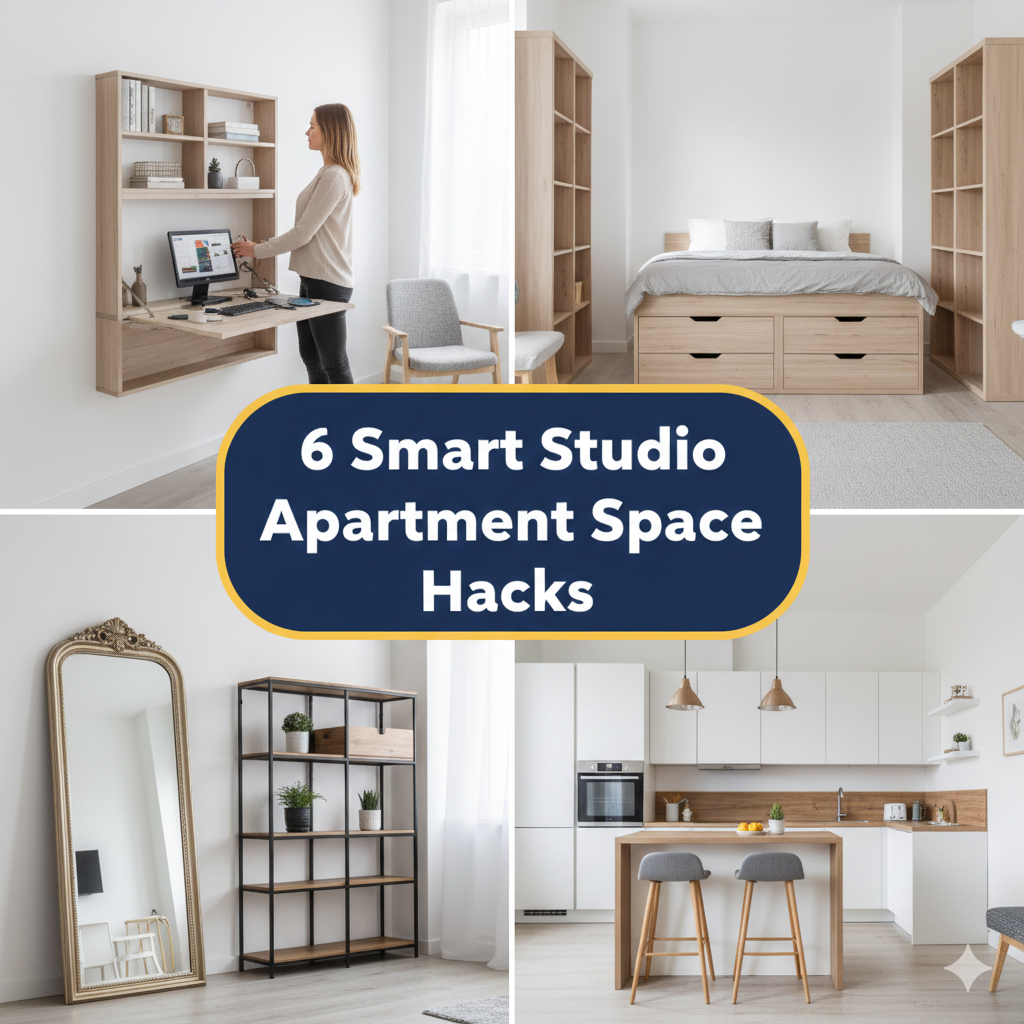
You moved into a studio apartment. You have a bed, a sofa, a desk, and a dining table and chairs. And it all somehow resembles a furniture traffic jam.
Sound familiar?
Placement of furniture is among the most challenging aspects of studio living. When your bedroom, living room, and kitchen all exist within the same four walls, every inch of furniture must pull double duty. One misstep and the entire space seems cramped, chaotic, and tiring to inhabit.
The great news? You don’t need more space. You need a smarter plan.
Let these 6 studio apartment space hacks for perfect furniture placement show you exactly how to set up your space so it feels open, organized, and truly livable. No interior design degree required. Just simple, tried-and-tested strategies you can implement today.
What You Should Know About Furniture Placement in a Studio
In a typical house or multi-room apartment, a bad furniture arrangement is annoying at worst. In a studio, it’s suffocating.
All of the furniture you own vies for the same floor space. Without intent, your layout leads to strange corridors, wasted corners, and a space that never quite feels right — no matter how many times you rearrange it.
Good furniture placement does three things in a studio:
It creates the effect of separate zones — so that your sleeping area doesn’t bleed into your living area.
It optimizes floor space — so you can navigate without running into anything.
It dictates the visual weight of the room — making sure nothing feels too heavy, too crowded, or too bare.
When these three elements combine, a 400-square-foot studio can feel surprisingly expansive. Let’s dig into how to make that happen.
The One Rule Every Studio Dweller Should Know First
Before getting into the hacks, there is one golden rule that does apply to them all.
Keep your floor as clear as possible.
Floor space is visual breathing room. The more floor you can see, the larger the space feels. Each of the hacks below is built around this principle. Keep it in mind as you read.
Hack #1 — Anchor Each Zone With a Rug to Define Separate Areas
Here’s something most people don’t seem to understand: rearranging furniture alone isn’t enough to make a studio feel organized. You also need visual boundaries.
That’s exactly what rugs do.
In a studio apartment, a well-placed rug acts like an invisible wall. It tells the eye “this is the living area” or “this is the sleeping area” — without using any actual wall space or room dividers.
This is one of the most powerful studio apartment space hacks because it doesn’t cost much, yet makes a huge difference to how the room feels and functions.
Rugs as Zone Markers — How to Use Them
Living zone: Place a rug under your sofa and coffee table. As a general rule, all four legs of the sofa should be on or near the rug. This grounds the seating area and gives it a visual break from the rest of the room.
Sleeping area: Put a rug under your bed — extending at least 18 to 24 inches on each side. This flanks the bed and gives the sleeping area a separate visual identity.
Dining zone: A round rug beneath a small dining table and chairs designates a dining nook without the use of walls or partitions.
The cardinal rule for rugs in a small space: Never go too small. A rug that is too small makes the room feel more choppy, not less. When in doubt, size up.
| Zone | Recommended Rug Size | Placement Tip |
|---|---|---|
| Living area | 8×10 ft or 9×12 ft | Front legs of sofa on the rug |
| Sleeping area | 5×8 ft or 8×10 ft | Centered under lower 2/3 of bed |
| Dining nook | 5×5 ft or 6×6 ft round | Centered under table and chairs |
Hack #2 — Push Furniture Against Walls (But Not All of It)
This is the most common studio furniture mistake: everything shoved against the walls.
It seems logical. More stuff on the walls = more open floor in the middle, right?
Actually, no.
When all the furniture is lined up against a wall, the room feels flat and institutional — almost like a waiting room. It also creates a dead, blank space in the center where nothing happens.
The smarter approach is a combination: most large pieces near walls, with one or two pieces floating slightly inward to create depth and define zones.
The Float-One Rule for Studio Apartments
Pick one piece of furniture to “float” — meaning it doesn’t touch any wall.
The best candidate is usually your sofa.
Pulling your sofa just 6 to 12 inches away from the wall instantly makes the room feel more intentional and designed. It creates a subtle visual separation between the living zone and the space behind it. You can even use that narrow strip behind the sofa to place a slim console table for extra storage.
What to Keep Against the Wall
Large, heavy pieces work best flush against walls:
- Bed frame and headboard
- Wardrobe or dresser
- Bookshelf or media console
- Desk (especially if placed near a window)
Keep these anchored. Float the sofa or an accent chair instead.
Hack #3 — Choose a Focal Point and Build Your Layout Around It
Every great room has a focal point. It’s the thing your eye goes to first when you walk in.
In a living room, it might be a fireplace or a large window. In a studio apartment, it’s generally whatever you decide it should be.
Choosing a focal point before you arrange furniture is one of the most underrated studio apartment space hacks. It gives your layout a sense of intention and order — rather than furniture placed wherever it happened to fit.
Tips for Choosing the Best Focal Point
Look around your studio. What is the most interesting architectural feature?
- A large window with a view
- An exposed brick wall
- A decorative fireplace
- A gallery wall you’ve created
If your studio has none of these, create one. A large mirror, a statement piece of art, or even a stylish media console with a TV can become your focal point.
Once you’ve chosen it, arrange your main seating to face it. In most studios, this means your sofa or reading chair points toward the focal point — which naturally organizes everything else around it.
Why a Focal Point Makes Furniture Placement Easier
Without a focal point, furniture arrangement feels random. With one, every placement decision has a reference point.
Ask yourself: does this piece support the focal point, or does it compete with it? This simple question removes a lot of the guesswork from studio furniture layout.
Hack #4 — Factor Multi-Functional Furniture Into Your Layout
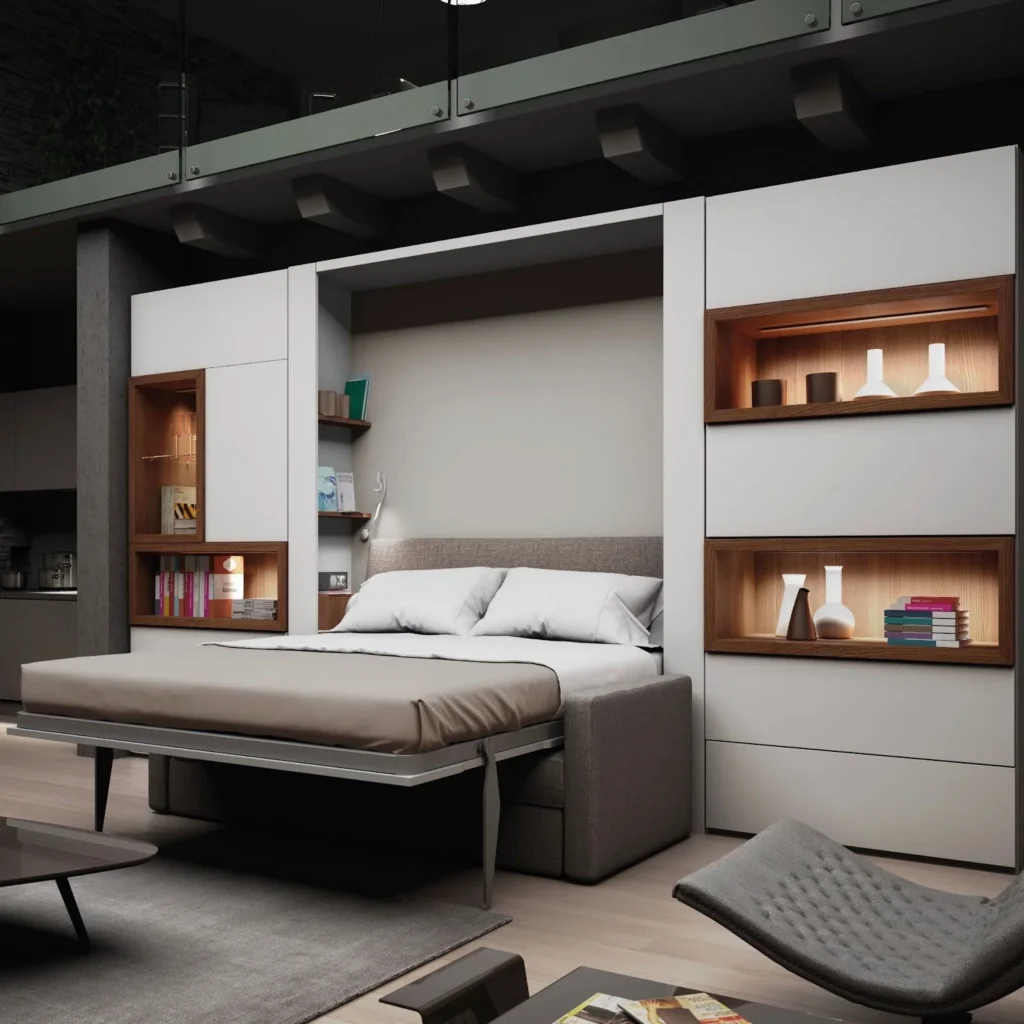
This might be the most practical hack on the entire list.
In a studio apartment, single-purpose furniture is a luxury you can’t really afford. Every major piece should serve at least two functions. When it does, you need fewer pieces overall — which means less visual clutter and more open floor space.
Multi-functional furniture isn’t just about saving space. It’s about building a smarter furniture layout from the ground up.
Best Multi-Functional Furniture Pieces for Studios
| Furniture Piece | Primary Function | Secondary Function |
|---|---|---|
| Storage ottoman | Seating/footrest | Hidden storage inside |
| Sofa bed / Murphy bed | Seating | Sleeping |
| Lift-top coffee table | Surface for drinks/decor | Workspace or dining table |
| Bed frame with drawers | Sleeping | Clothing/linen storage |
| Nesting tables | Side table | Extra dining/work surface |
| Bench with storage | Seating at foot of bed | Blanket and shoe storage |
| Fold-down wall desk | Wall decor | Compact workspace |
How to Place Multi-Functional Pieces for Maximum Effect
The key to placing multi-functional furniture is thinking about how each function will be used.
For example: if your coffee table doubles as a workspace, position it where you’ll have enough room to pull up a chair. If your sofa converts to a bed for guests, make sure there’s clearance on at least two sides when it’s unfolded.
Think about the movement path each piece requires when switching functions. Then build your layout around that movement.
For more in-depth inspiration on creating a functional and beautiful studio setup, Studio Apartment Setup offers a wide range of ideas tailored specifically to small-space living — from furniture picks to full room layout guides.
Hack #5 — Use Vertical Space to Draw the Eye Upward
Floor space is limited in a studio. But vertical space? That’s almost always wasted.
Most studio dwellers restrict their furniture and decor to the first five feet of height. Everything above that — from five feet to the ceiling — goes completely unused.
This is a massive missed opportunity.
Using vertical space does two important things. First, it adds storage and functionality without touching your precious floor area. Second, it draws the eye upward, which makes the ceiling feel higher and the room feel larger.
Studio-Approved Ways to Go Vertical
Floor-to-ceiling bookshelves: These are one of the best investments for studio living. They provide enormous storage capacity while taking up only a few inches of floor depth. A tall, slim bookshelf in the corner of your studio can hold hundreds of items.
Wall-mounted shelves: Float shelves above your desk, sofa, or bed to store books, plants, and decorative items. This keeps surfaces clear and draws the eye up.
Tall headboards: A tall upholstered or wood headboard makes the bed feel grander and draws the eye toward the ceiling behind it.
Hanging storage: In kitchen areas, hang a pot rack or magnetic knife strip on the wall. This frees up counter space and adds visual interest.
High-hanging curtains: Mount your curtain rod as close to the ceiling as possible. Let the curtains drop all the way to the floor. This elongates the wall and makes the entire room feel taller — even if your windows are small.
Vertical Space Cheat Sheet
CEILING ──────────────────────────────────────────
 9–10 ft │ Curtain rods, top of tall bookshelves
 7–8 ft  │ Wall-mounted shelves, hanging storage
 5–6 ft  │ Eye-level art, mirrors, wall hooks
 3–4 ft  │ Most furniture tops (sofas, tables)
 0–2 ft  │ Floor level (keep as clear as possible)
──────────────────────────────────────────────────
The more intentionally you use each level, the more organized and spacious the whole room feels.
Hack #6 — Use Mirrors and Light to Make Any Layout Feel Bigger
This final hack works differently from the others. It doesn’t change where your furniture goes. It changes how your furniture layout feels.
Mirrors and lighting are the two most powerful visual tools in small-space design. Used correctly, they can make a thoughtfully arranged studio feel almost twice as large.
The Mirror Placement Formula for Studios
A mirror reflects light and depth. When placed correctly, it creates the illusion of a second room beyond the wall.
Here’s how to place mirrors for maximum impact:
Opposite a window: This is the most effective placement. The mirror bounces natural light back across the room, doubling the brightness and creating the illusion of an outdoor view on both sides.
At the end of a narrow space: If your studio is long and narrow, hang a large mirror at the far end. This visually extends the room and prevents it from feeling like a corridor.
Behind a light source: Placing a mirror behind a lamp or candle reflects and amplifies the light — great for evenings when natural light is gone.
Full-length leaning mirrors: These are studio workhorses. They reflect the entire room, make ceilings feel taller, and function as practical dressing mirrors. Lean one against a wall at a slight angle for the best effect.
Lighting Zones That Make Your Layout Shine
Overhead lighting alone makes a studio feel flat and small. Layered lighting — multiple light sources at different heights — makes even the simplest furniture layout feel warm, inviting, and well-designed.
According to the Architectural Digest guide to small space lighting, using multiple light sources at varying heights is one of the most effective tricks for making compact spaces feel larger and more intentional.
Here’s how to layer your lighting:
| Light Type | Purpose | Best Placement |
|---|---|---|
| Overhead/ceiling light | General illumination | Center of room or each zone |
| Floor lamp | Ambient/zone lighting | Corner of living or reading area |
| Table lamp | Task and mood lighting | Beside bed, on desk, or side table |
| LED strip lights | Accent and depth | Under bed frame, behind TV, under shelves |
| Sconces | Space-saving task light | Mounted on wall beside bed |
When each furniture zone has its own light source, the zones feel more defined and the overall room feels larger and more purposeful.
Putting All 6 Hacks Together — A Sample Studio Layout Plan
Here’s how a single studio can use all six hacks at once:
The Entrance: A slim console table (multi-functional — Hack #4) with wall hooks above it and a mirror on the adjacent wall (Hack #6).
The Living Zone: A sofa floated 8 inches from the wall (Hack #2), anchored by an 8×10 rug (Hack #1), facing a gallery wall focal point (Hack #3). A floor lamp in the corner and a storage ottoman as a coffee table round things out.
The Sleeping Zone: A bed with built-in drawers (Hack #4) against the back wall, framed by a rug (Hack #1), with wall-mounted sconces on each side (Hack #6) and floating shelves above (Hack #5).
The Workspace: A fold-down wall desk (Hack #4) mounted near a window, with a tall bookshelf beside it (Hack #5) and a small mirror opposite the window (Hack #6).
This entire layout can fit comfortably in a 400–500 square foot studio — and it will feel far more spacious than those numbers suggest.
Studio Furniture Placement — The Dos and Don’ts
| ✅ Do This | ❌ Avoid This |
|---|---|
| Use rugs to define zones | Using rugs that are too small |
| Float your sofa slightly from the wall | Pushing all furniture flush to walls |
| Choose a focal point before arranging | Placing furniture wherever it fits |
| Pick multi-functional pieces | Filling space with single-use furniture |
| Use vertical wall space actively | Leaving everything above 5 ft bare |
| Layer lighting across zones | Relying only on one overhead light |
| Place mirrors opposite windows | Hanging mirrors randomly with no purpose |
Frequently Asked Questions
Q: What’s the most common furniture placement mistake in studio apartments?
Shoving all furniture against the walls. It seems logical, but it makes the room feel flat and disconnected. Float at least one piece — usually the sofa — slightly away from the wall to create depth and a more intentional layout.
Q: How do I create a sense of separate rooms in a studio without walls or dividers?
Use rugs, lighting zones, and furniture groupings to define each area. A rug under the sofa creates a living zone. A rug under the bed creates a sleeping zone. Different light sources in each area reinforce the separation even further.
Q: How much space should I leave for walkways between furniture?
Always leave at least 24 to 36 inches for main pathways — the routes you walk every day. For secondary access (like the side of a desk or the foot of the bed), 18 inches is the minimum comfortable clearance.
Q: Should I buy a sofa bed for my studio?
It depends on your lifestyle. If you have frequent overnight guests, a sofa bed is a smart multi-functional choice. If you rarely host guests, a regular compact sofa will serve you better — sofa beds tend to be heavier and bulkier than standard sofas.
Q: Can a large piece of furniture work in a small studio?
Yes — with the right placement. One large statement piece (like a king bed or a full-size sofa) can actually make a studio feel more intentional and less cluttered than several small pieces fighting for attention. The key is keeping everything else minimal around it.
Q: Is it better to have more furniture or less furniture in a studio?
Almost always less. Every piece of furniture you add reduces visual and physical floor space. Aim for the minimum number of pieces that covers your daily needs, and make sure each piece earns its place by serving more than one function where possible.
Q: How do I choose the right sofa size for a studio apartment?
Measure your space before buying. As a general rule, your sofa should not take up more than one-third of the total floor width. In a 12-foot-wide room, that means a sofa no wider than around 80 inches. Always check dimensions on paper before the delivery truck arrives.
The Bottom Line
A studio apartment doesn’t have to feel small.
It just has to be arranged with intention.
These 6 studio apartment space hacks for perfect furniture placement give you a clear, practical roadmap — from anchoring zones with rugs to layering light and using vertical space. You don’t need to buy all new furniture or hire an interior designer. You need to look at what you have and place it smarter.
Start with one hack this weekend. Rearrange your sofa. Add a rug. Hang a mirror opposite your window. Small shifts in placement create surprisingly big changes in how a space feels.
Your studio has more potential than you think. It’s time to unlock it.