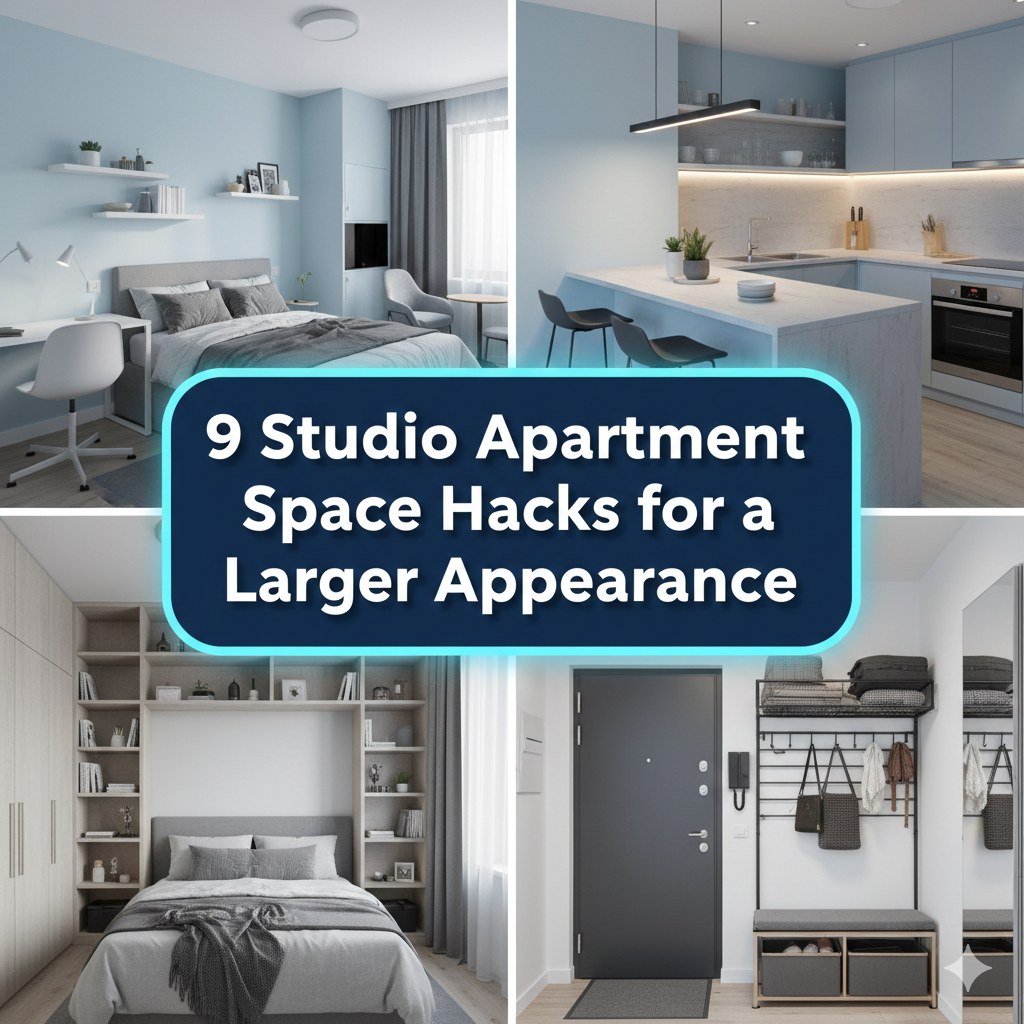
Your Studio Isn’t Too Tiny — You’re Just Not Arranging It Correctly
The vast majority of people who live in studio apartments say the same thing: “I just need more space.”
But that is seldom the actual issue.
The real issue is that the space they have isn’t working for them. The furniture is too big. The colors are too dark. The layout fights the room instead of flowing with it. Storage is out in the open rather than hidden.
Address those issues, and a 350-square-foot studio can feel like a whole new place.
This article breaks down 9 stealth studio apartment space hacks that allow rooms to feel even more spacious — not just look spacious in photos, but actually feel larger, more open, and livable day-to-day.
No major renovations. No huge budget. Just clever, uncomplicated adjustments that add up quickly.
Why “Feeling Bigger” Is More Important Than Square Footage
Before tackling the hacks, it’s helpful to understand why some small spaces feel fine and others feel suffocating.
It all comes down to three things: light, flow, and visual noise.
Light makes a room feel open. Darkness feels heavy, suffocating, and closed in.
Flow is about how smoothly your eyes and body travel through the space. When furniture restricts natural movement or sightlines, the room seems smaller.
Visual noise is clutter — either physical or visual. A brain feels overwhelmed when too many colors, patterns, objects, and surfaces are vying for attention. And a brain that is overwhelmed interprets the space as small and chaotic.
Every hack on this list attacks at least one of those three things. Most target all three.
Hack #1: Get Rid of the Heavy Furniture and Lower Everything to the Ground
Big, bulky furniture is not a studio’s friend.
A towering wardrobe, a massive sectional sofa, or an immense bookshelf with a solid frame — these pieces take up visual as well as floor space. They make walls feel closer. They make ceilings feel lower.
The Low-Profile Furniture Rule
Low-profile furniture allows the top half of your room to breathe. When your eye can roam the length of a room without striking a visual barrier every couple of feet, the space instantly feels larger.
Here is what this looks like in practice:
| Swap This Out | Replace It With |
|---|---|
| Tall chest of drawers | Low 3-drawer dresser or under-bed storage |
| Oversized sectional sofa | Slim-armed 2-seater or loveseat |
| Heavy wooden bed frame | Low-platform bed frame |
| Tall TV stand or armoire | Floating wall-mounted TV shelf |
| Big bulky desk | Slim wall-mounted fold-down desk |
| Full bookshelf unit | Floating shelves at eye level |
The point is not to have less furniture. It’s to own furniture that doesn’t visually crowd the room.
What Low-Profile Does for a Room
Think of it like a landscape and its horizon line. The further down the horizon, the larger the sky appears. The same applies to your studio. Lower furniture = more visible wall = more visible ceiling = bigger-feeling room.
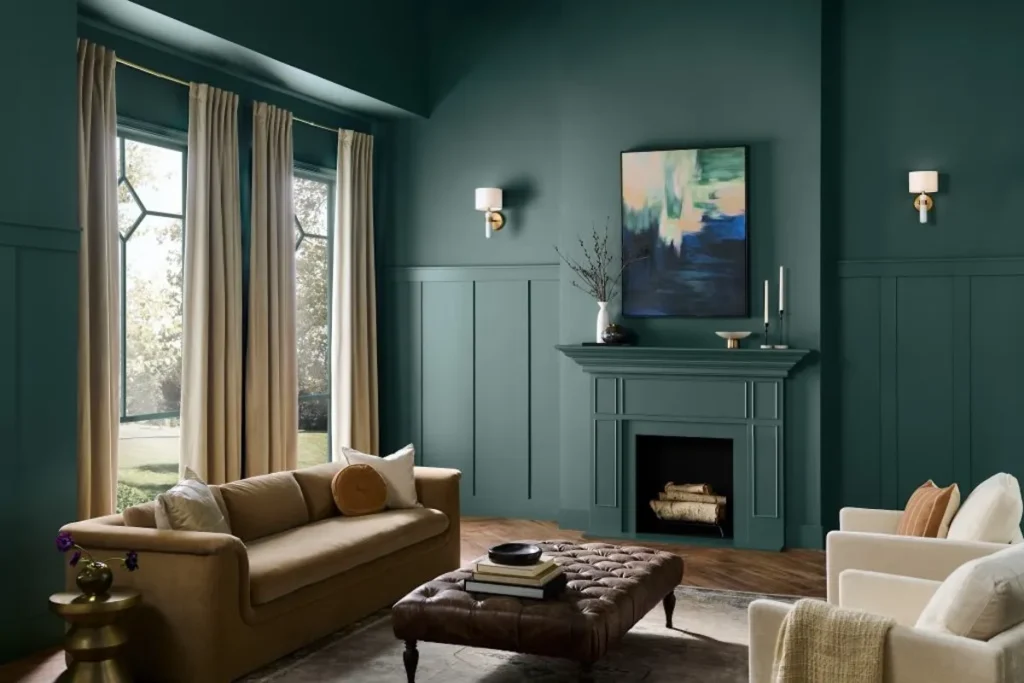
Hack #2: Paint Everything the Same Color (Yes, Really)
This one catches a lot of people off guard.
Most design advice suggests adding personality with an accent wall or a colorful mix. In a studio, that kind of advice typically has the reverse effect.
Every time a color changes — wall to wall, wall to ceiling, or wall to furniture — your eye registers a boundary. Boundaries make spaces feel fragmented and smaller.
The Same-Color Secret
The lines vanish when your walls, ceiling, and trim are painted the same color. The space reads as one continuous room. And a continuous space always seems larger than one that is divided.
In interior design, this is sometimes referred to as “color drenching.”
The best colors for this technique in a studio:
- Soft white or warm white — bounces back the most light, feeling clean and open
- Warm cream or off-white — less harsh than blinding white, feels welcoming and expansive
- Very pale greige (grey-beige) — versatile, works with most furniture colors
- Soft sage green — injects personality while remaining atmospheric
- Pale dusty blue — soothing and expansive, especially with natural light
Steer clear of cool greys, dark hues, or anything with dense pigment — those absorb light instead of reflecting it.
If You Can’t Paint
If you’re renting and aren’t allowed to paint, extend this principle to your soft furnishings instead. Choose a rug, curtains, sofa cover, and bedding in the same color family. A tonal, cohesive palette does much of the same work.
Hack #3: Hang Your Curtains High and Wide
This is one of the quickest, least expensive studio apartment space hacks that makes rooms feel bigger — and almost nobody gets it right.
Most people hang curtains straight at the window frame. That’s a mistake.
The Correct Method for Hanging Curtains in a Studio
Place the rod as high on the wall as you can. Not above the window — at the ceiling. That fools the eye into believing that the window — and thus the ceiling — is taller than it really is.
Extend the rod several inches on both sides of the window frame. When the curtains are open, they sit on the wall, not on the glass. This gives the window a wider appearance and allows more light to enter.
Use floor-length curtains. Sill or mid-wall-length curtains visually chop the room. The ceiling appears higher and the room feels more finished with floor-length panels.
Curtain Color and Fabric Tips
| Feature | What to Choose | What to Avoid |
|---|---|---|
| Color | Match wall color or go slightly lighter | Heavy contrast to the wall |
| Fabric | Sheer linen, light cotton | Velvet, heavy blackout fabric |
| Pattern | Solid or very subtle texture | Bold prints or horizontal stripes |
| Length | Floor length (just kissing the floor) | Sill length or cropped |
Sheers are ideal for studios in particular because they filter light rather than block it. For privacy, layer a sheer panel with a light roller blind behind it.
Hack #4: Stick to One Large Rug Rather Than Many Small Ones
Rugs define zones in a studio — that much is well known. But the size and number of rugs matters just as much as where you place them.
Small rugs are one of the most common studio mistakes.
An undersized rug floats alone in the center of a zone and leaves the area feeling disjointed and choppy. It creates more visual borders, not fewer.
The Large Rug Rule
One large rug that properly accommodates your main living zone — with all the furniture legs on it, or at least the front legs — anchors the space and makes it feel intentional and expansive.
How to size a rug for your studio living area:
- The rug should extend at least 18 inches beyond the sides of your sofa
- Front legs of all seating furniture should touch the rug
- Leave 12–18 inches of bare floor around all four edges of the rug
- In a studio under 400 sq ft, a 6×9 rug is often the minimum; an 8×10 is typically preferred
Rug Color and Pattern for Space
For making a studio feel larger, stick to:
- Light, neutral tones — cream, beige, warm grey, soft taupe
- Low-pile or flat weave — does not visually add bulk to the floor
- Simple patterns or subtle texture — a very small geometric or tone-on-tone works well
- Avoid dark colors and bold patterns — they pull the eye downward and shrink the room
Hack #5: Use Mirrors to Reflect Light Strategically
Mirrors are one of the oldest tricks in the interior design playbook. But there’s a proper way to use them and an improper way.
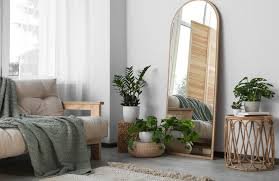
Hanging a mirror randomly on a wall helps a little. Placing mirrors strategically changes everything.
Where to Place Mirrors for the Biggest Impact
Opposite a window: This is the most potent mirror placement in a studio. The mirror reflects the view and the light from the window, effectively doubling your natural light source and creating the illusion of a second window.
On a narrow wall at the end of a hallway or room: This makes the space seem to extend past the wall — an old trick that creates perceived depth.
As a full closet door panel: Functional and effective. A mirrored sliding closet door makes the bedroom zone feel twice as wide.
Leaned against the wall at floor level: A large leaning mirror in a corner feels less formal and more like a window into another room.
Mirror Size Matters
| Mirror Type | Best Placement | Effect |
|---|---|---|
| Large leaner (5–6 ft) | Living zone wall or corner | Adds major depth and height |
| Full-length narrow mirror | Bedroom zone | Space and function |
| Mirrored closet doors | Closet area | Dramatically widens the zone |
| Grouped small mirrors | Gallery wall | Adds shimmer and light play |
| Oversized round mirror | Feature wall | Softens the room, adds depth |
Do not place mirrors where they reflect clutter or a dark corner. A mirror that reflects a mess simply doubles the visual noise.
Hack #6: Elevate Your Bed and Use the Space Underneath
The bed takes the single largest footprint in a studio apartment. It occupies more floor space than anything else.
The vast majority of people just accept that and work around it.
Smart studio dwellers turn that logic on its head. Rather than working around the bed, they put the bed to work.
The Raised Bed Strategy
Elevating your bed with bed risers — usually 6 to 8 inches — opens up a whole new storage zone underneath. It’s not just practical. It also changes the visual feel of the room.
A slightly elevated bed creates a visual “gap” between the mattress and the floor. This gap lets in light. And light makes the room feel larger.
Here’s what you can store under a raised bed:
- Flat storage bins for off-season clothing
- Shoe storage boxes
- Extra bedding and pillows in vacuum bags
- Suitcases and travel bags
- Flat organizers for books, files, and paperwork
Bed Risers vs. Platform Beds With Storage
| Option | Cost | Storage Capacity | Visual Effect |
|---|---|---|---|
| Bed risers (6–8 inch) | $ (Very cheap) | High (open space) | Light, airy gap |
| Platform bed with drawers | $$$ | Medium (fixed drawers) | Clean, built-in look |
| Ottoman/storage bed | $$$ | Medium-high | Plush, furniture-like |
| DIY raised platform | $$ | High | Custom, seamless |
For budget renters, bed risers are the quickest and cheapest option. For those who can afford the investment, a platform bed with built-in drawers offers a cleaner look.
Hack #7: Go Transparent — Lucite, Glass, and Acrylic Pieces
Transparent furniture is one of the most underrated studio apartment space hacks to make a room feel bigger.
Transparent furniture — made from glass, lucite (clear acrylic), or smoked acrylic — does occupy physical space but almost no visual space. Your eye passes right through it, giving the brain the impression that there is more open space in the room.
Where Transparent Furniture Works Best
Coffee table: A lucite or glass coffee table in your living zone is virtually invisible. Compare that to a solid wood or upholstered table, which blocks the sightline to the floor and wall behind it.
Side tables: Clear acrylic side tables are some of the most inexpensive transparent pieces you can buy. They work in any studio style.
Dining chairs: Clear acrylic or ghost chairs around a small dining table create a much more open-feeling dining zone than solid chairs would.
Desk chair: If you work from home in your studio, a clear acrylic desk chair keeps the workspace zone from feeling heavy.
The Transparency Principle
The more your eye can see through — or past — a piece of furniture, the larger the space appears.
This doesn’t mean everything needs to be made of glass or acrylic. Even one or two transparent pieces in the right spots can make a noticeable difference to how open a studio feels.
Hack #8: Declutter Your Sightlines, Not Just Your Surfaces
Most decluttering advice focuses on surfaces — counters, tables, shelves. That matters, but it is only part of the story.
In a studio, sightline clutter is just as damaging as surface clutter.
What Is Sightline Clutter?
Sightline clutter is anything that obstructs the visual path your eye travels when it scans the room.
What do you see when you stand at your front door and look into your studio? Cords dangling from a desk? A shelf stacked with mismatched items? A pile of shoes by the couch?
Each one of those is a visual speed bump. They slow the eye, break up the room, and signal “small and cluttered” to your brain.
How to Clear Your Sightlines
Cord management: Bundle and hide cables. Use cable clips, cord covers, or simply route them behind furniture. One visible cable is not a significant concern. Five are a visual disaster.
Shelf editing: Get rid of at least 40% of what’s on your shelves. Keep only what is beautiful, useful, or meaningful. Leave breathing room between objects.
Under-furniture gaps: Keep the space under sofas and chairs clear. Shoes, bags, and random items stuffed under furniture close off those light gaps and make the room feel heavier.
Closet control: If your closet has no door, it’s a sightline. Organize it, or hang a curtain.
Consistent containers: Use matching bins, baskets, and boxes for storage. A shelf of 10 matching white boxes looks very different from a shelf of 10 random containers.
Hack #9: Choose Legs Over Pedestals — Let the Floor Show
This is one of the simplest and most overlooked studio apartment space hacks that gives any room an airier feel.
Furniture that sits directly on the floor — with no legs, no gap, no light underneath — visually “anchors” to the floor. It feels heavy. It makes the room feel denser.
Legged furniture does the reverse.
Why Legs Matter
When furniture has legs — even short ones — a gap forms between the bottom of the piece and the floor. Light travels through that gap. Your eye interprets it as open space.
This is why mid-century modern furniture feels so light and airy. The legs are an aesthetic feature, but also a psychological tool.
Apply this principle to every piece of furniture you choose:
- Sofa: Pick one with legs, not a skirted or platform base
- Armchair: Same rule — legs, not a base that sits flush to the floor
- Bed frame: A frame with legs feels lighter than a platform that extends to the floor
- Storage units: Open-bottom shelving units feel lighter than closed-base cabinets
- Bedside tables: Slim-legged nightstands over chunky boxed ones
A Quick Visual Test
Before buying any piece of furniture for your studio, crouch down and look at it from the side. Can you see light under it? If yes, it will keep your space feeling open. If not, ask yourself if there’s a legged alternative.
How These 9 Hacks Work Together
None of these hacks exists in a vacuum. They’re most powerful when combined.
Here’s a simple before-and-after comparison that shows what stacking these hacks looks like:
Before: Typical Studio Setup
- Dark sofa pushed against the wall with no legs
- Curtains hung at the window frame
- Small rug floating in the middle of the room
- Mixed furniture colors and styles
- Surfaces crowded with objects
- No mirrors
- Stuff piled under the bed
Result: The space feels claustrophobic, dark, and smaller than it actually is.
After: Space-Optimized Studio
- Low-profile sofa with legs, pulled slightly from the wall
- Curtains hung at ceiling height, extending past the window
- Large rug anchoring the full living zone
- Unified color palette wall-to-wall
- One large mirror opposite the main window
- Clear acrylic coffee table
- Bed raised on risers with flat storage bins underneath
- Shelves edited to 60% capacity
Result: That same square footage feels vastly more open, bright, and livable.
If you want a full room-by-room guide to setting up your studio from scratch, Studio Apartment Setup is an excellent resource with layout ideas, furniture tips, and practical decoration advice.
Studio Space Hacks: At-a-Glance Summary
| Hack | What It Targets | Difficulty | Cost |
|---|---|---|---|
| 1. Low-profile furniture | Visual flow | Medium | $$ |
| 2. Paint same color | Light + boundaries | Easy | $ |
| 3. High, wide curtains | Illusion of height | Easy | $ |
| 4. Large single rug | Visual anchoring | Easy | $$ |
| 5. Strategic mirrors | Light + depth | Easy | $–$$ |
| 6. Raised bed | Storage + airiness | Easy | $ |
| 7. Transparent furniture | Visual weight | Medium | $$–$$$ |
| 8. Sightline decluttering | Visual noise | Easy | Free |
| 9. Legged furniture | Floor visibility | Medium | $$ |
Frequently Asked Questions
Q: What is the single best studio apartment space hack to make a room look larger?
If you had to choose just one, mirrors are probably the highest-impact change for the least amount of effort. A single large mirror placed opposite a window can make your studio feel greatly more open in an afternoon. That said, layering the curtain trick (hanging high and wide) with a unified wall color comes very close.
Q: How can I make my studio feel larger without spending a lot of money?
Absolutely. Three of the most powerful hacks on this list are free or very low-cost: sightline decluttering costs nothing, hanging curtains higher only requires a new rod and your time, and repainting (if you own or have permission) is one of the least expensive changes you can make per square foot. Bed risers usually come in under $20 and can completely change how a room feels.
Q: Is furniture placement really that impactful in a studio?
Yes — more than most people realize. Even if a space is generous in size, furniture that obstructs natural paths of movement or sightlines creates a cramped feeling. Pulling your sofa a few inches off the wall, positioning pieces to create an unbroken path through the room, and removing one or two things that don’t serve an obvious purpose can go a long way toward making a studio feel markedly more open.
Q: Is it better to use dark or light colors in a studio apartment?
Light is almost always preferable when it comes to making a space feel bigger. Light colors reflect more light, lessen visual mass, and create the impression of greater distance between walls. If you enjoy dark colors, use them as accents — a dark throw pillow or a piece of artwork — rather than on large surfaces like walls, rugs, or sofas.
Q: How can I make my studio apartment not feel like one big room?
Zone it intentionally. Anchor the living area with a large rug, mark the sleeping zone with a separate light source over your bed, and set up a fold-out or wall-mounted desk with a task lamp for your workspace. Use a bookshelf or curtain as a soft divider. The idea is to give each zone a sense of individuality without literally separating them — which would actually make the space feel smaller.
Q: Is transparent or glass furniture difficult to maintain in a small apartment?
It needs a bit more cleaning — fingerprints and smudges are more visible on glass and acrylic than on wood or fabric. But in a studio where every visual detail counts, the payoff of a visually “open” coffee table or side table is well worth that extra minute of wiping it down. Microfiber cloths work well for both glass and acrylic surfaces. According to Good Housekeeping, a simple solution of dish soap and warm water is all you need to keep glass surfaces spotless.
Q: What is the biggest mistake people make when trying to make a studio feel larger?
Buying more storage. This may sound counterintuitive, but introducing more shelves, more bins, and more visible storage containers often just makes a studio feel more cluttered — not less. The real solution isn’t more storage — it’s fewer things that need storing. Combine any storage upgrade with a serious declutter of what you actually own.
Your Studio Has More Potential Than You Think
A small space is not a handicap. It’s a design problem — and design problems have solutions.
These 9 studio apartment space hacks to make rooms feel bigger are not about lying to yourself into thinking you have a mansion. They’re about clearing out the things — visual, physical, and psychological — that make an otherwise perfectly fine space feel worse than it is.
Low furniture. Light colors. High curtains. One big rug. Strategic mirrors. A raised bed. Transparent pieces. Clear sightlines. Legs on everything.
None of these are complicated. None require a contractor. Most can all be done in a single weekend.
Start with whichever hack seems most manageable right now. Make that change. Live in it for a week. Then pick the next one.
Small changes stack. And a thoughtfully set-up studio — even a tiny one — can feel like the most comfortable, functional, and beautiful space you’ve ever lived in.