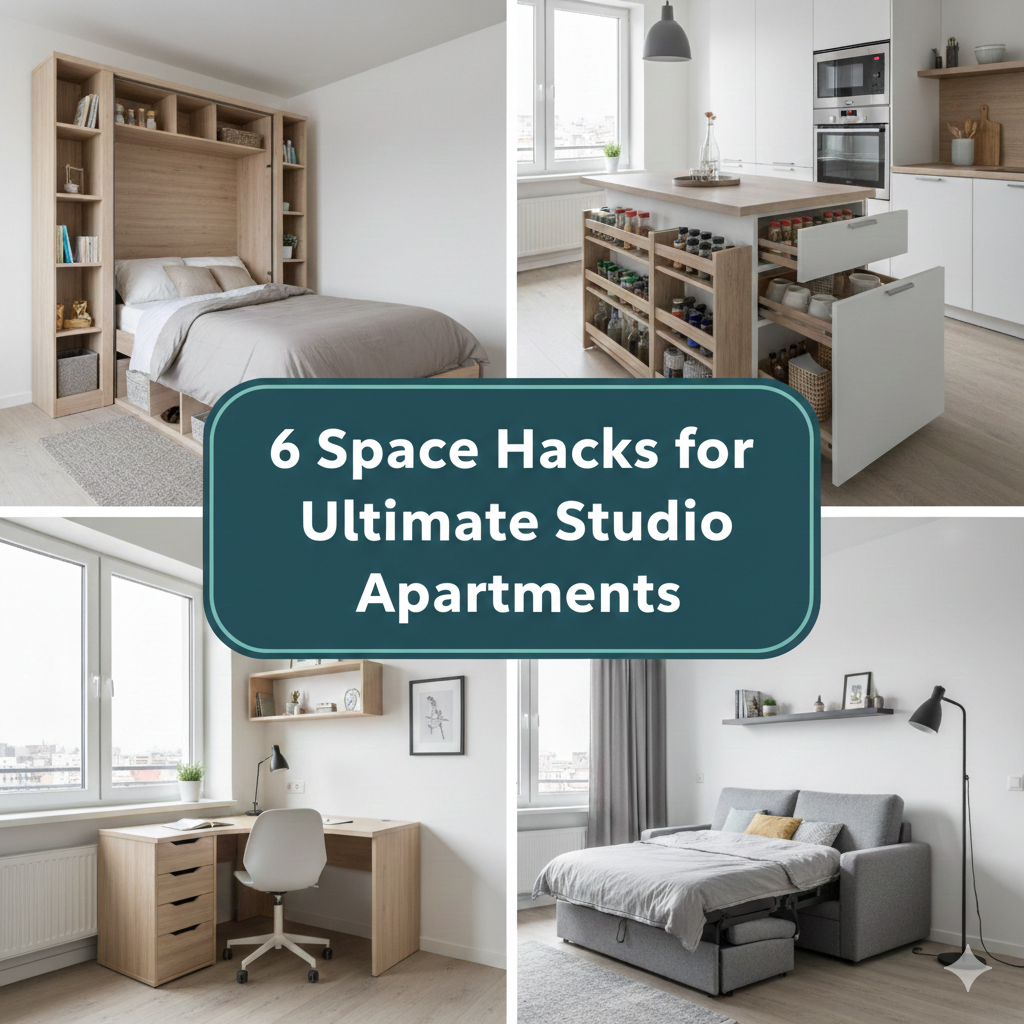
Your Small Area Holds More Promise Than You Realize
One could say that living in a studio apartment is like a puzzle to solve every day.
Where do you put the couch? What separates your bedroom from your living situation? What do you do when a friend would like to spend the night?
These are real problems. But the great news is — studio apartment space hacks with DIY furnishings can fix almost all of them. And you don’t need to be a carpenter or spend a fortune to do it.
This guide includes 6 no-quit, practical hacks real people use to help small spaces feel bigger, smarter, and way more livable. Each tip includes advice you can put into action this weekend.
Let’s get into it.
Hack #1 – Build a Loft Bed and Free Up Your Floor Space

Why the Ground Is Your Most Underutilized Asset
In a studio apartment, your square footage is everything. Every square foot of floor you clear up opens the place up to feel larger.
One of the best DIY projects you could do is a loft bed. It elevates your sleeping footprint up off the ground, freeing up a massive amount of usable space beneath.
That space below can become:
- A mini home office
- A cozy reading nook
- A small closet or wardrobe area
- A sitting area with a loveseat or bean bags
Simple Loft Bed Frame Instructions
You do not need advanced woodworking skills. A basic loft bed frame uses:
- 4×4 lumber posts for the legs
- 2×6 boards for the frame
- Plywood sheet for the base
- Ladder rungs made out of dowel rods or 2×4 pieces
Most hardware stores will cut the lumber to size for you. Total material cost typically ranges from $150 to $300, depending on the region.
Tip: Add a curtain to the bottom area for a workspace or storage space. It costs next to nothing, but adds a massive visual impact.
Safety First
Do ensure your loft bed is anchored to at least one wall. Use heavy-duty L-brackets and wall anchors. Your bed must be stable enough that it does not shake when you get onto it. If it does, add cross bracing to the sides.
Hack #2 — Double Your Space With a Custom Murphy Bed
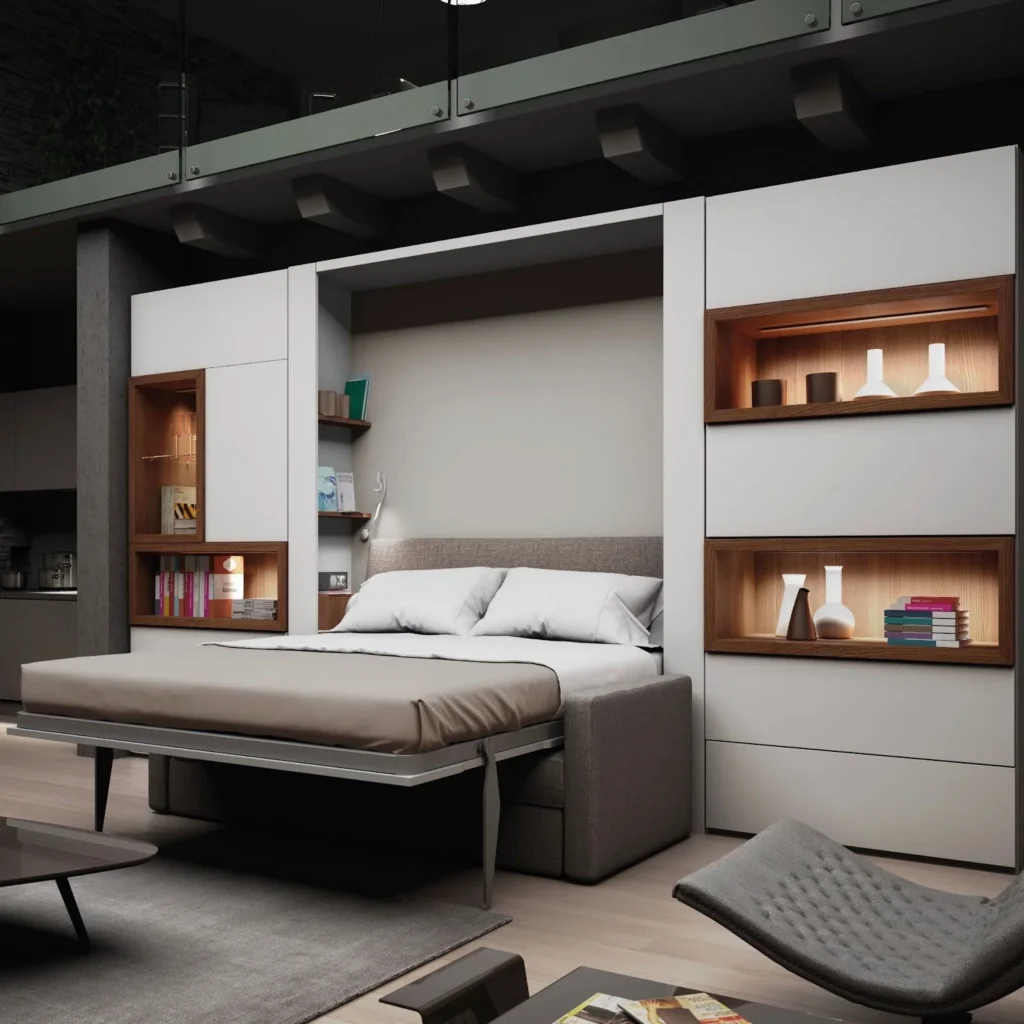
A Vanishing Bed Is Magic
A Murphy bed (or wall bed) folds away into a cabinet when you’re not sleeping in it. Your studio turns into a living room during the day. At night you flip it down and it’s a full bedroom.
This is one of the most used studio apartment space hacks with DIY furniture because it means that you can literally double the function of your space.
What You Need to Build One
Murphy bed hardware kits can be found online and in home improvement stores. Typically the mechanical parts alone sell for between $150 and $400.
The hardware is the key element in building out the rest of the cabinet frame. Most kits come with instructions. You’ll need:
- A drill and screwdriver set
- Plywood or MDF board
- Wood glue and pocket screws
- Paint or wood stain
- The Murphy bed hardware kit
Add Shelving On the Sides
Here’s where it gets clever. Create floor-to-ceiling bookshelves on each side of the Murphy bed cabinet. When the bed is folded up, it resembles a lovely built-in bookshelf. When it is folded down, the shelves remain in their place.
You gain storage AND sleeping space without losing an inch.
| Feature | Murphy Bed | Regular Bed |
|---|---|---|
| Space used during the day | 0 sq ft | 40–60 sq ft |
| DIY cost range | $300–$700 | $200–$600 |
| Setup difficulty | Medium | Easy |
| Flexibility | Very High | Low |
| Visual impact | High | Low |
Hack #3 — Create a Storage Room Divider
One Space, Two Vibes
One of the greatest difficulties in a studio is that everything has to happen in one room. You eat, sleep, work, and relax in the same place. This can give your home a chaotic feeling.
A DIY room divider can provide zones without building permanent walls. And when you add storage to it, a single piece of furniture offers two advantages.
For even more layout ideas and design inspiration, check out Studio Apartment Setup — a great resource for making small spaces work smarter.
The Open Bookcase Divider
An open-back bookcase turned perpendicular to the wall serves beautifully as a divider. You can construct one from scratch or adapt a flat-pack unit.
Here’s how to make it better:
- Use back-to-back shelving on both sides
- Use baskets or bins for concealed storage
- Keep some parts open for decorative objects or plants
- Stabilize it with a thin rod attached to the ceiling so it won’t fall over
If you build from scratch, this type of DIY divider costs about $80 to $200 in materials.
The Pegboard Wall Divider
Option two is a pegboard panel divider. Mount two or three large pieces of pegboard to a freestanding frame. Then hang with pegboard hooks and bins:
- Kitchen utensils
- Jewelry or accessories
- Small plants in hanging pots
- Art supplies or tools
It’s a room divider AND an organizer. A little visual texture goes a long way toward giving personality to an otherwise plain studio.
Curtain Rod Dividers — The Easiest Pick
If DIY woodworking is not your thing, mount thick curtains from ceiling-mounted rods. Hang floor-to-ceiling curtains in a bold print or luxurious material to create an even more defined and dramatic room.
It costs between $30 and $80 at most, and takes an afternoon.
Hack #4 — Create Floating Shelves to Command Your Vertical Space
Don’t Look Down, Look Up!
People living in small apartments mostly use their floor and counter space, but they completely neglect the walls above eye level. That’s a huge missed opportunity.
Floating shelves are one of the simplest DIY projects you can undertake. They require few tools and can be accomplished in a single afternoon.
What to Store on Floating Shelves
- Books and magazines
- Mugs, spices, and jars from your kitchen
- Decorative plants and photo frames
- Folded towels or small baskets
- Electronics and charging stations
How to Build Them Right
In floating shelves, the wall anchors are where the magic happens. Make doubly sure to find the wall studs before you drill. A stud finder tool is around $15 and totally worth it.
For the actual shelves, you can use:
- 1×8 or 1×10 pine boards (inexpensive and takes stain well)
- Salvaged wood for rustic appeal
- Plywood with edge banding for a modern look
One way to arrange shelves in a studio apartment:
- Zone 1 (Near the kitchen): Shelves at 5–6 feet high for jars, mugs, and cooking supplies
- Zone 2 (Over the desk): Eye-level shelves, plus one up high for books and files
- Zone 3 (Over the bed): One long shelf at 6–7 feet for nightstand items and décor
- Zone 4 (Entryway): A thin shelf at shoulder height for keys, mail, and small bags
It creates a large storage grid across your blank walls and can be had for no more than $50 to $120 in materials.
Hack #5 — Build a Fold-Down Desk for a Disappearing Home Office
The Challenges of Working From Home in a Small Space
More people are working from home than ever before. In a studio apartment, it’s a real challenge to find space for a desk without having the entire room feel like an office.
The solution? A fold-down wall desk. It attaches to the wall and folds up against it when you’re done working. Then when you need it, you fold it down and it turns into a full workspace.
How to Build a Fold-Down Desk
This is one of the most satisfying studio apartment space hacks with DIY furniture because the outcome looks so neat and professional.
Here’s what you need:
- 1 piece of 3/4-inch plywood (approx. 24 x 36 inches)
- Two folding desk brackets (these fold flat when the desk is closed)
- Wall screws and anchors
- A small piano hinge if you want the desk to fold down from the top
- Paint or wood finish
Steps:
- Prepare your plywood sheet by cutting and finishing
- Secure the folding brackets to your wall at desk height
- Screw the plywood onto the brackets
- Give it a small lip on the front edge so things don’t fall off
- Paint or stain to coordinate with your space
Total cost: $40 to $100
Enhance It With Smart Add-Ons
After you’ve assembled your fold-down desk, customize it by adding:
- A small pegboard panel above it for supplies and tools
- Magnetic strips to hold metal items
- A folding stool that tucks under the desk when not in use
- Cable management clips to keep cords neat
The whole setup tucks away into the wall when it all folds up. Nobody would even know there was a workspace there.
According to HGTV’s small space design guide, fold-down furniture is one of the top-recommended solutions for maximizing functionality in compact living spaces.
Hack #6 — Make Under-Bed and Under-Everything Storage
The Most Neglected Space in Any Studio
Every single piece of furniture in your studio apartment has storage potential beneath it. Most people use none of it. That’s essentially free storage space going to waste.
In a typical studio, you can discover hidden storage below:
- The bed (if it sits on legs)
- The couch
- A DIY window seat bench
- A coffee table with a lower shelf
- Ottoman cubes that open up
Build a Storage Bed Frame From the Ground Up
One of the simplest, most useful DIY projects for any studio is a platform bed with built-in drawers. Here’s a simple version:
Construct a low platform box from 3/4-inch plywood. Trim the top to fit your mattress size. Attach four to six side pull-out drawers. Use full-extension drawer slides so you can reach all parts of the inside.
The drawers can hold:
- Clothing and seasonal items
- Bedding and extra pillows
- Shoes and bags
- Books and hobby supplies
This does the job of a dresser and storage unit all at once. Cost to build: $120 to $250, depending on size and materials.
Build a Window Seat With Storage Inside
If your studio has a window alcove or even just an expanse of wall adjacent to a window, build a simple bench box there. The top lifts open for storage within.
Use 3/4-inch plywood, put a foam cushion on top, and cover it with fabric. Now you have a seating area AND hidden storage. It costs approximately $60 to $130 to build.
DIY Ottoman Cubes
These are just plain boxes with padded covers. Use them stacked or arranged as a coffee table, additional seating, or a footrest. Each one stores items inside. They can be built for $25 to $50 each with plywood and upholstery foam.
The Studio Layout — Bringing It All Together
Here’s how all 6 hacks would work together in a typical 400-square-foot studio:
| Area | Hack Used | What It Does |
|---|---|---|
| Sleeping zone | Loft bed or Murphy bed | Frees up floor space to create workspace below |
| Living/work zone | Fold-down desk + room divider | Separates work from relaxing |
| Walls | Floating shelves | Adds storage without using floor space |
| Storage | Under-bed drawers + window bench | Hides clutter out of sight |
| Layout flow | DIY bookcase divider | Creates visual zones |
When these components all come together, a 400-square-foot studio can feel as organized and functional as a 700-square-foot apartment.
Budget Breakdown — How Much Will Everything Cost?
If you do everything yourself, here’s a realistic estimate:
| Hack | Low Estimate | High Estimate |
|---|---|---|
| Loft or platform bed | $150 | $300 |
| Murphy bed | $300 | $700 |
| Room divider | $30 | $200 |
| Floating shelves | $50 | $120 |
| Fold-down desk | $40 | $100 |
| Under-bed/window storage | $60 | $250 |
| Total | $630 | $1,670 |
When you do all 6 projects yourself, it saves thousands compared to purchasing retail furniture with similar functionality.
Tips to Consider Before You Start Building
Things to keep in mind before you grab a hammer:
Check your lease. Some apartments have restrictions on drilling into walls or making structural changes. Make sure to ask your landlord before you begin.
Measure twice, cut once. It’s an old saying, but it will save you money. Always double-check your measurements.
Start with one project. Never attempt all 6 hacks at the same time. Choose the one most likely to solve your largest problem first.
Buy quality hardware. Cheap hinges, brackets, and drawer slides don’t last long. Spend a little extra on hardware — it makes the whole piece last longer.
Watch YouTube tutorials. Thousands of free videos guide you through each step of these builds. Visual learning makes a huge difference.
FAQs on Studio Apartment Space Hacks With DIY Furniture
Do I require specialized equipment to build these projects?
Not at all. These builds tend to call for little beyond a drill, a saw (or pre-cut lumber from the hardware store), sandpaper, and standard hand tools. Most hardware stores will cut wood to size for you free of charge or for a small fee.
Is it okay to drill into apartment walls?
It depends on your lease. A lot of landlords will allow small holes for shelving, particularly if you patch them when you leave. For big projects like loft beds, you should always get written permission first.
Which hack returns the most space?
The loft bed and Murphy bed provide the most dramatic results, because they free your floor space entirely. If you’re only doing one project, do one of these.
How long do these DIY projects take?
Floating shelves can take 2–3 hours. A fold-down desk takes approximately half a day. Building a Murphy bed or loft bed is a weekend project. Storage platforms can take one day and up to an entire weekend based on the design.
Can I take these projects with me when I move?
Most of them, yes. Floating shelves leave small holes in the wall. Room dividers and ottoman cubes are entirely freestanding. Murphy beds can be uninstalled, but there is some patching that may be required. Platform beds can be taken apart and reassembled in a new location.
What if I’m not good at DIY?
Start simple. Floating shelves and fold-down desks are easy for beginners. You can pick up furniture kits from IKEA or Amazon that require almost no assembly but still provide most of the same benefits.
Small Space, Big Life
A studio apartment doesn’t have to seem cramped or cluttered. With clever studio apartment space hacks with DIY furniture, you can make even the smallest room feel thoughtful, functional, and completely yours.
The 6 hacks this guide covers — loft beds, Murphy beds, DIY room dividers, floating shelves, fold-down desks, and hidden storage — all work in concert to create more room without moving into a bigger place.
Start with one. Build your confidence. Then keep going.
By the time you finish even half of these projects, your studio will be a totally different home. And you will have built it yourself — that makes it all the better.