Every designer I know has walked into a studio and spotted the same thing immediately. That long, empty stretch of wall above the furniture, running all the way up to the ceiling, completely ignored. Sometimes three feet of it. Sometimes four. And in that same room, bags are living on the floor, the kitchen counter has nowhere left to breathe, and the closet door barely closes.
The vertical space is right there. Doing nothing.
This is the most consistent missed opportunity I see in studio apartments, and the frustrating part is that it isn’t hard to fix. Most people simply haven’t been trained to see the upper half of their walls as usable territory. The storage instinct most renters operate on is horizontal: floor, countertop, tabletop, and then it stops somewhere around eye level. Everything above that gets mentally filed away as airspace.
That mental model is costing people a significant amount of storage. And changing it requires almost no construction, no major investment, and no contractor.
1. Stop Thinking in Furniture Heights, Start Thinking in Zones
The first thing I do when I walk into a studio for a consultation is look up, not around. The floor plan may be fixed, but the vertical footage is almost always wide open.
I think about every wall in three zones.
Zone 1 is the daily-reach zone: from about 18 inches off the floor up to roughly five feet. Everything you need regularly lives here. Zone 2 is the stretch zone, five to about seven feet. Weekly items, less-used tools, reference books. Zone 3 is the step-stool zone, seven feet up to the ceiling. This is for seasonal things, backup supplies, overflow linens, anything that genuinely doesn’t need to be grabbed before your first coffee of the morning.
The problem is that most people load Zones 1 and 2 and leave Zone 3 entirely empty. That’s a meaningful band of wall real estate being treated like the top of a doorframe.
One practical detail that makes Zone 3 actually usable: everything up there needs a container. Lidded boxes, labeled bins, closed baskets. When items are stored openly at height without containment, the effect is visually chaotic from below, even if the objects themselves are technically organized. Box it, label it, and Zone 3 works quietly in the background while you live your life below it.
2. What Actually Holds Weight at the Right Height
Not all vertical storage is equal, and this is where a lot of genuine effort fails. I see it constantly: someone installs two floating shelves at mid-height, fills them with plants and ceramics, and the underlying storage problem changes not at all.
Decorative shelves and functional storage shelves are two different things. They look similar at the store and perform very differently at home.
Here’s an honest comparison of what most people are actually working with:
| Storage Type | Best For | Weight Capacity | Renter-Friendly? |
|---|---|---|---|
| Freestanding tall shelving unit | Books, kitchen, full-wall storage | High | Yes, zero installation |
| Bracketed floating shelves | Display, kitchenware, collections | Medium to High | Depends on wall type |
| Pegboard panel | Kitchen tools, hooks, accessories | Low to Medium | Yes |
| Tension pole shelving | Corners, narrow bathroom gaps | Low to Medium | Yes, no holes needed |
| Wall-mounted cabinets | Kitchen and bathroom zones | High | Requires drilling |
| Over-door organizers | Pantry, bathroom, closet backs | Low | Yes, zero installation |
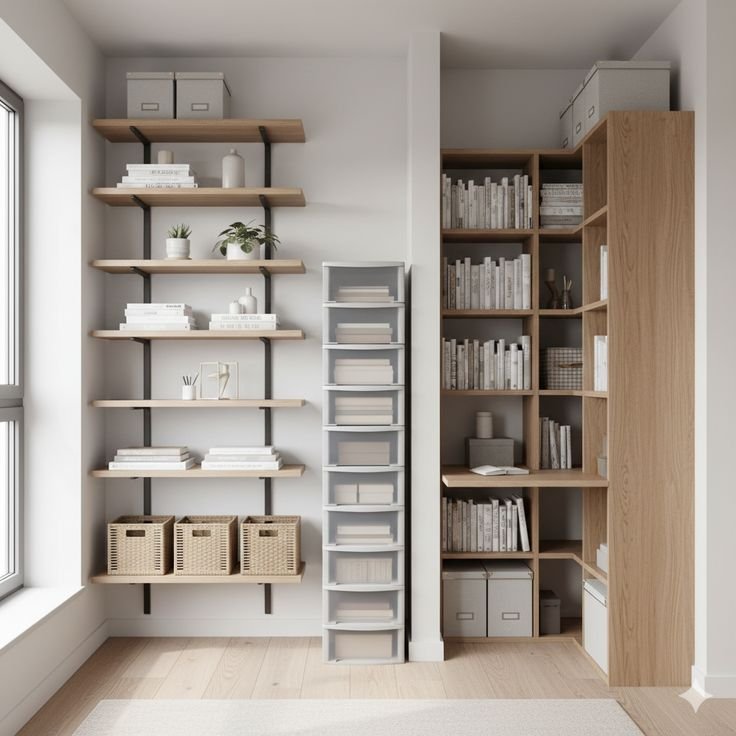
For renters who cannot put significant holes in walls, a tall freestanding shelving unit placed flat against a wall is the highest-impact move available. Floor to near-ceiling coverage, no brackets, and completely reversible when you move. Tension pole shelves are particularly good in corners and bathroom areas. For anyone who owns their studio, the investment in properly anchored wall-mounted cabinetry in the kitchen pays off dramatically in terms of storage per square foot.
3. The Shelf-and-Fill Trap (and Why the Room Still Feels Busy)
This is the part nobody talks about, so I’m going to say it plainly.
People install shelves, fill them up, and still feel vaguely dissatisfied. The room looks cluttered. Nothing reads as intentional. So they conclude that vertical storage doesn’t work for their space and stop there. But that conclusion is wrong, and here’s what actually happened.
They fell into the shelf-and-fill trap. You create storage capacity and then feel obligated to fill every inch of it, because empty space in a small apartment feels like wasted space.
It isn’t.
A shelf holding twelve objects looks dramatically different from that same shelf holding eight, even if both arrangements are technically neat. Visual weight matters enormously in a small room. Going vertical draws the eye upward, which is exactly the right instinct in a studio. But if what the eye lands on at height is a wall of tightly packed stuff with no breathing room, the visual effect is exhausting rather than elegant.
My personal rule for open vertical shelving in a studio: every third shelf should have some lightness to it. Not empty, just less loaded. A trailing plant, a single ceramic piece, a stack of three books with a little air on each side. That rhythm is what separates a styled shelving wall from a storage dump. And here’s the thing, it doesn’t actually require less storage, it requires more thoughtfulness about what goes where. Which is a different problem, and a much more solvable one.
4. Kitchen and Bathroom Vertical Space: Two Rooms Where People Give Up Too Early
These two rooms are consistently the worst offenders for wasted vertical real estate.
In the kitchen, the gap above the upper cabinets goes unused in nearly every studio I’ve walked into. Most standard kitchen uppers stop well below the ceiling, leaving 12 to 18 inches of open space above them. That zone can hold labeled bins of backup pantry items, rarely used appliances, extra serving dishes, you name it. It doesn’t need to look beautiful. It needs to be organized. A uniform row of matching lidded boxes up there reads more like a design choice than a storage concession, especially when they share a color or finish.
Wall-mounted magnetic knife strips above a prep counter immediately free up a full drawer. A simple rail system with S-hooks beside the stove holds your most-used pots and pans off the counter, off the shelf, and visible. A pegboard panel in a kitchen corner can absorb an astonishing amount of small tools that otherwise get buried in drawers.
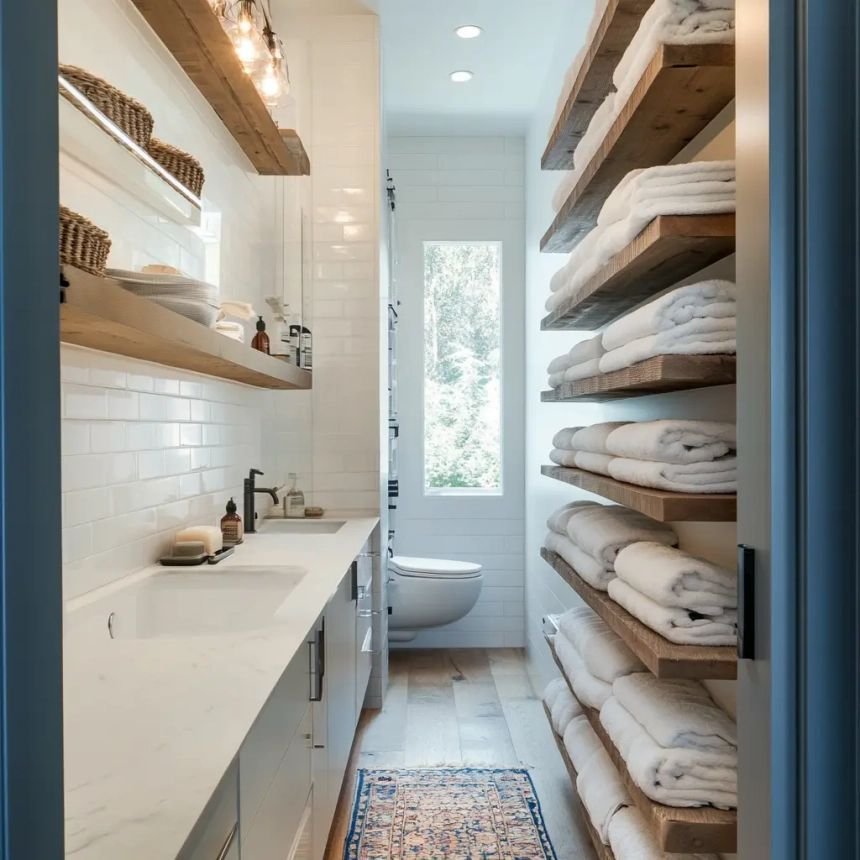
In the bathroom, the space above the toilet is the most obvious win, and it’s been obvious long enough that I’m almost hesitant to mention it. But the one that Studio Apartment Setup consistently highlights, and that actually surprises renters, is the back of the bathroom door. An over-door hook strip or slim organizer holds hair tools, cleaning supplies, folded hand towels, backup toiletries. That vertical surface is invisible when the door is open, completely functional, and completely free.
A narrow floating shelf between the vanity and the shower, at two staggered heights, can hold more than you’d expect. These bathroom walls are short, sure, but they’re just as real as any other wall.
5. When Vertical Storage Looks Good, Not Just Full
I want to be direct about something here, because it matters to me professionally and it affects how comfortable people feel in their own homes.
Storage in a studio is never invisible. You’re living with it, eating next to it, looking at it first thing in the morning. How it looks is part of how the room feels. And how the room feels is part of how your life feels inside it. That might sound like a designer overstatement, I know. But ask anyone who has ever lived in a chaotic studio versus an organized one.
Three things consistently make vertical storage look considered rather than accumulated. First, color cohesion: when the bins, baskets, and containers on open shelving share a color family, the entire wall reads as a deliberate design element rather than a collection of random objects. Pick two neutrals, or one neutral and one accent, and apply them consistently. Second, height variation: a shelf filled with identically-sized objects is visually flat. Mix tall with short, introduce a horizontal element like a stacked pair of books, and the eye moves naturally up the column. Third, and this is the detail I keep returning to in small-space work, what you put on the top visible shelf anchors everything below it. A trailing plant, a sculptural object, a piece of art leaned against the wall. Something that signals this was chosen. When that top shelf looks intentional, the whole shelving wall reads as intentional, and the room lifts.
Studio Apartment Setup has good guidance on product sizing for studio-specific storage setups, which is worth checking when you’re planning out which shelving dimensions actually fit the walls you’re working with.
6. Four Specific Mistakes Worth Naming Before You Spend Anything
These come up constantly, and naming them now prevents a lot of wasted money.
Shelves that are too narrow. A shelf with six inches of depth barely holds a row of spice jars. For functional vertical storage, you want a minimum of ten to twelve inches, ideally more for kitchen or utility shelving. Anything narrower becomes display-only and won’t solve a real storage problem.
Shelves spaced too far apart. If you space every shelf 18 inches apart to accommodate a few tall bottles, you’re wasting the air above every shorter item. Adjustable shelving systems solve this, because you can reconfigure spacing as your storage needs shift.
Treating the top of the wardrobe as decor-only space. That flat surface is functional storage. A uniform row of matching lidded boxes holds extra bedding, seasonal clothing, luggage, documents, and from below it reads as intentional built-in storage rather than clutter. Label the boxes, and you’ll never dig through them blindly.
And the one that surprises people: corners. Corners are the most consistently underdeveloped vertical zones in studio apartments. A tall narrow corner shelving unit, a ladder shelf leaning into a corner, even a slim bookcase positioned at a slight angle, all of these turn dead corner air into real storage without shrinking the room. Corners give you vertical capacity in a footprint that takes almost no floor space at all.
FAQs
My floating shelves keep slowly pulling away from the wall. What’s going wrong?
Almost certainly they were anchored into drywall only, without hitting studs or using hollow-wall anchors rated for the load. Drywall alone should not carry more than 20 to 25 pounds per shelf. For heavier loads, locate the studs (typically spaced 16 inches apart), use lag screws, and the shelves will hold. A stud finder costs about ten dollars and prevents a significant amount of wall damage.
I have 8-foot ceilings. Is it still worth going vertical, or is that too low to matter?
Eight-foot ceilings give you plenty. A shelving column that runs from 18 inches off the floor up to 7.5 feet represents six feet of vertical storage in a footprint that might be 12 inches wide. That’s a substantial amount of capacity, and ceilings that low don’t require a step stool for the upper zone, which is actually a practical advantage.
Does it feel oppressive to have tall shelving units in a small studio?
Only if you overdo it. A single tall shelving wall on one side of a studio reads as architectural. Tall storage units on two or three walls simultaneously creates that hemmed-in feeling. Pick one primary vertical wall, do it well, and leave the others lighter.
What’s the fastest way to start using vertical space without committing to permanent changes?
Add one tall freestanding shelving unit to the most underused wall in the room. No installation, no anchors, completely reversible. You’ll see immediately how much vertical storage you were treating as empty air. From there, you can make more deliberate decisions about what to invest in more permanently.
Should I approach kitchen vertical storage differently from living area storage?
Somewhat, yes. In the kitchen, accessibility and visibility matter most because you’re reaching for things while cooking and shouldn’t have to dig. Open shelving with clear containers, or items you actually use daily hanging in plain sight, works best there. In the living area, the aesthetic dimension carries more weight, so a mix of closed storage and open display will feel more considered than purely utilitarian stacking.