Every week I walk into a studio and the first thing I spot isn’t the furniture arrangement or the paint color. It’s the curtains. Hung right at the window frame, panels barely grazing the sill, rod sitting two inches above the glass. And I already know, before I even look at the rest of the room, why the space feels smaller than it should.
This is probably the most consistent mistake I see in small spaces. Not just in studios, but studios make it more visible because there isn’t enough square footage to absorb the damage. A single bad installation decision and the room reads compressed, the ceiling drops visually, and all the careful furniture sourcing in the world won’t fix it.
The fix is simple. But you need to understand why it works before you’ll trust it enough to actually do it.
1. What Window-Level Hanging Actually Does to a Room
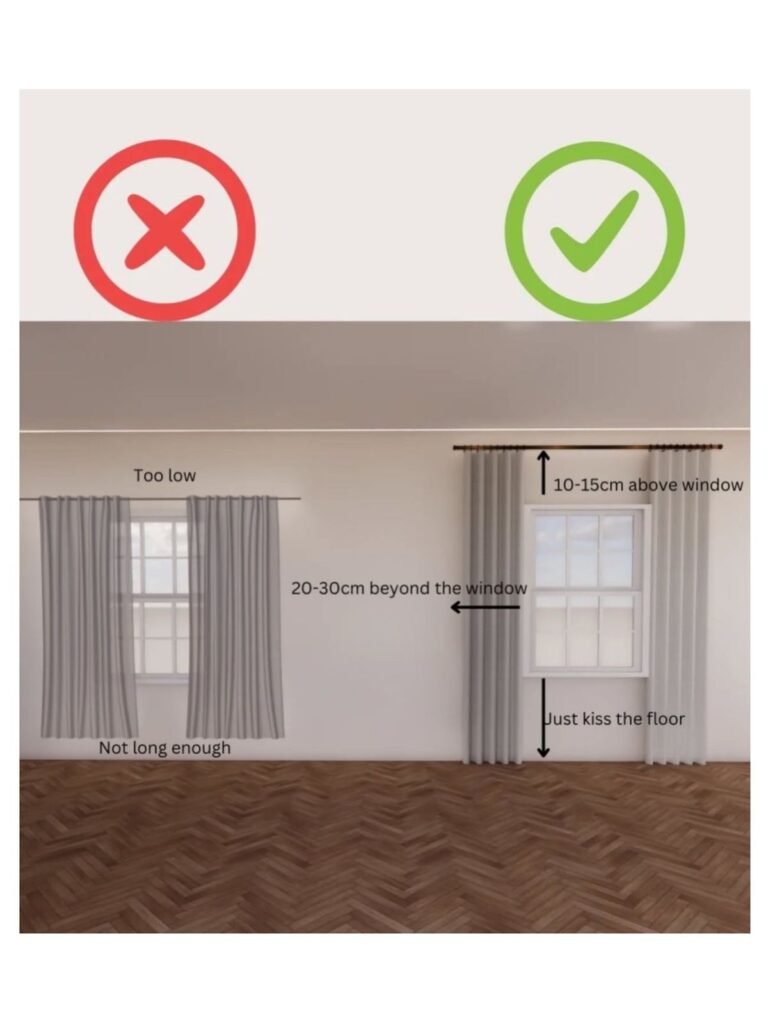
When your curtain rod sits directly above the window frame, your eye reads the wall as two separate zones: the blank wall above the window and the window itself. There’s a hard visual stop at the top of the glass. The ceiling appears closer than it is. The window appears smaller than it is. And the room, regardless of how thoughtfully you’ve decorated it, feels like it has a lid on it.
What you want is a vertical line. A curtain panel that runs from near the ceiling down to the floor turns the window wall into one continuous element. The eye travels up and down without interruption, which is the signal the brain uses to register height.
Hung at window level, the curtain is functioning as a window covering. Hung near the ceiling, it’s functioning as an architectural feature.
There’s also a practical problem that people miss. When the rod is at window height and the panels are pulled open, they pile up on either side of the actual glass and visually narrow the window. You lose width. You lose daylight. The thing you were trying to frame is now partially obscured by the fabric that was supposed to enhance it.
2. The Rule Designers Actually Follow
The rod goes within four to six inches of the ceiling. Not four to six inches above the window. Four to six inches below the ceiling.
If your studio has eight-foot ceilings (which most standard ones do), your rod is going up around seven feet four inches to seven feet six inches from the floor. The curtain panels then fall from that point straight to the floor, with either a half-inch break or a very slight drape. Not hovering above the baseboard. Not sweeping dramatically across the floor. Just arriving at it, cleanly.
That gap between the rod and the ceiling is intentional. It gives the brackets room to breathe without butting against crown moulding, and it keeps the installation from looking jammed or cramped. You want the rod to feel like it belongs near the ceiling, not like it’s in retreat from the window below.
Over at Studio Apartment Setup, this question comes up constantly because the visual difference is so significant and the fix is so simple. But people hesitate. That stretch of exposed wall between the window top and the ceiling, before the curtain covers it, looks odd while you’re holding the brackets. Once the panels hang, that wall disappears into the fabric and the ceiling takes over.
It looks wrong until it doesn’t. And then it looks exactly right.
3. The Numbers You Need to Know Before You Buy
Studio apartments typically have eight or nine-foot ceilings, with windows that start anywhere from eighteen to thirty-six inches off the floor. That means the gap between the top of your window and the ceiling is often twenty-four to forty-eight inches of wall that most people either ignore or try to fill with art.
A curtain panel fills it better than anything else, because it’s part of the window composition rather than a separate decision.
Here’s the practical breakdown for the choices you’ll actually be making:
| Element | Common Mistake | What to Do Instead |
|---|---|---|
| Rod placement | 2–4 inches above window frame | 4–6 inches below ceiling |
| Panel length | Stopping at sill or hovering above floor | Floor-length with slight break (96″ or 108″ panels) |
| Rod width | Exactly matching window width | Extend 6–12 inches beyond each side of the window |
| Fabric type | Single sheer panel only | Sheer liner plus weighted outer panel |
| Panel count | One panel per window | Two panels (one on each side) |
That rod width note matters. When you extend the rod beyond the window on each side, the panels stack off the glass when open. The full window is exposed. More light comes in. The window reads as wider. Height and width are now both working, and the effects compound.
This is exactly why I always tie curtain decisions into how lighting works in a studio. Natural light is the strongest tool in a small space, and your curtains are either supporting it or fighting it. At window height with short panels, they fight it. Hung correctly, they maximize every inch of daylight you have.
4. Where People Get It Wrong and Stay Wrong
The mistake gets made on moving day. The curtain rod goes up in a hurry, the brackets go into the wall at the most convenient height (which happens to be directly above the window), and the panels go on. Done. And then it just stays that way for the entirety of the tenancy because no one wants to re-drill holes into a rental wall.
Some people know the rule and try to apply it but do it tentatively. They move the rod up by three or four inches, feel like that’s a meaningful improvement, and leave it. Three inches above the window is not near the ceiling. Near the ceiling means the bracket is close enough that you could almost reach the crown moulding from it.
The hesitation is understandable. The gap of bare wall above a high-mounted rod looks strange when there are no panels on it yet. But once the fabric hangs, that wall is gone. It becomes part of the curtain composition rather than a visual gap.
And then there’s the panel length issue, which catches people off guard. Standard curtains come in 63-inch, 84-inch, and 96-inch lengths. If your rod is going at seven feet six inches, you need a 90-inch or 96-inch panel at minimum. Many people buy 84-inch panels, mount the rod near the ceiling, and end up with curtains that hover conspicuously above the floor. At that point, the height of the rod is working against them because the wrong panel length makes the installation look unfinished.
Measure your drop from the bottom of the ring or bracket to the floor before you purchase anything.
This connects directly to how vertical space works in a studio. Every element that reaches from floor to ceiling adds perceived height. Curtains are one of the easiest and most dramatic versions of that principle, but only when the installation is actually taking advantage of the full vertical range.
5. Hardware, Fabric, and the Details That Finish the Job
A flimsy tension rod that’s held up by wall pressure alone will sag in the center once weighted fabric is on it, and it’ll sag worse over time. For any rod spanning more than four feet, use a rod with a center support bracket or one that’s rigid enough not to bow. The center support bracket costs almost nothing and saves the entire look.
Fabric direction matters more than people realize. A curtain with a strong horizontal stripe or a wide geometric pattern running side to side will visually cut the wall into sections, which is exactly the opposite of what you’re trying to accomplish. Solid fabrics work well. Vertical stripes are excellent. Textural weaves with no dominant horizontal movement are ideal. If you want pattern, think about whether the pattern’s dominant lines are moving the eye up or across.
Clip rings add a small amount of height by raising the top of the panel above the rod itself. Worth knowing when you’re calculating drop. The panel hangs from the bottom of the ring, not the top of the rod, so account for the ring height in your measurement.
Over time, at Studio Apartment Setup we’ve covered enough of these interconnected visual decisions that readers start seeing how they compound. A correctly hung curtain placed near a well-positioned mirror, for instance, creates a combined effect that’s larger than either element alone. The curtain pulls the eye upward, the mirror extends the sense of horizontal space, and together they make the room feel like it has more of both. You can read more about how mirror placement either helps or undermines a studio to understand where that combination works best.
The final note on hardware: in a rental, check your lease before drilling multiple sets of bracket holes. Most landlords are fine with small holes that get properly patched on move-out, but it’s worth confirming. Some renters go with heavy-duty adhesive mounting strips for lighter rods, though these really are only suitable for lightweight sheers on short spans. Anything heavy needs real wall anchors.
FAQs
Does this technique still work in studios with very low ceilings?
Yes, and low ceilings actually benefit from it most. When panels run from near the ceiling to the floor, they train the eye to move vertically before registering the ceiling as low. Even in a seven-foot-ceiling studio the effect is real. The room won’t suddenly feel like a cathedral, but it will feel noticeably less compressed.
What if my curtain panels are already bought and they’re 84 inches?
Don’t scrap them immediately. Move the rod up as high as the 84-inch panel allows without leaving an obvious gap at the bottom. You’ll still get partial benefit from the height, and you can note the correct panel length for when these wear out or when you move. Even a partial improvement is worth the re-drilling.
Should both panels in a pair always be the same length?
Yes, unless one side of the window has a physical obstruction like a radiator, a deep window seat, or furniture that prevents the panel from reaching the floor. In that case a single floor-length panel on the unobstructed side can work, though it reads better balanced.
Does curtain color affect how the height trick reads?
It does. A panel that closely matches the wall color makes the fabric nearly invisible against the wall, which amplifies the vertical illusion. A dark curtain against a light wall creates a defined edge that partially interrupts the effect. That’s not a reason to avoid dark curtains, it’s just something to factor in when you’re choosing between two options you otherwise like equally.
Is there a point where the rod can be too close to the ceiling?
Only if you have ornate crown moulding that you’d rather not cover. In that case, keep the rod just below where the moulding begins. Otherwise, closer to the ceiling is almost always better.
The rod goes near the ceiling. The panels go to the floor. The window looks bigger, the room reads taller, and every other design decision you’ve made gets a better foundation to sit on. It’s a small correction that almost no one makes on their own, but once you see what it does to a room, you can’t unsee it.